
Smart Object Mockups
Smart Object Mockups in Photoshop are a complete game-changer to speed up your daily workflow in creating assets. It’s an often overlooked part of Photoshop. You probably know that a Smart Object locks a rasterized image’s resolution so that you can now scale it up and down without worrying about loss of pixel information, but there’s a much bigger use for Smart Objects that will change the way you make mockups and templates within Photoshop.
Let’s say you have a social asset that needs to be sized for Instagram Stories, Instagram Feed and Facebook Feed. All three assets have the same copy, the same imagery, the same background but each week you want to switch out some of the imagery to create an updated asset. This could take a while depending on how you go about it. But let’s setup a Photoshop file that will save you a ton of time!
PSD Artboard’s Setup
In this tutorial, we will be setting up three artboards in Photoshop. One for Instagram Stories, one for Instagram feed, and the third for Facebook.
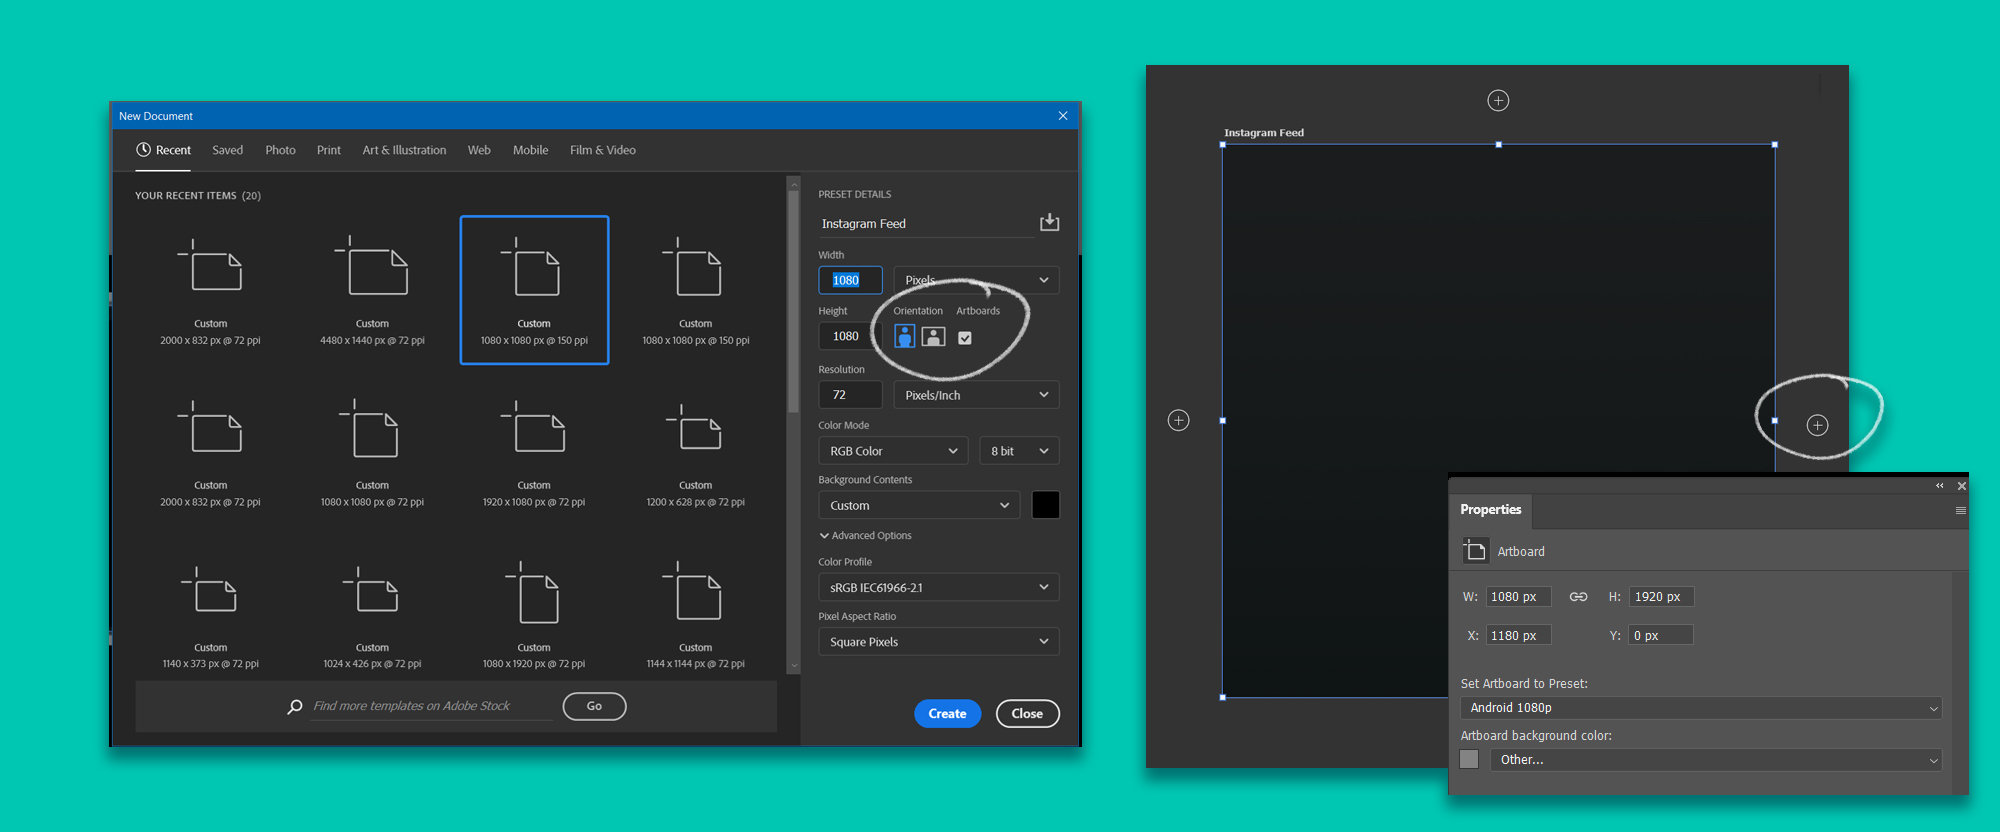
To start with let’s create a new document with the size 1080×1080 and a resolution of 72DPI and select the tick box that says Artboards. Now you should see your new artboard in Photoshop, and on the top right of it will say Artboard 1 – if it doesn’t then that means you did not tick the Artboard tick box when you created this document.
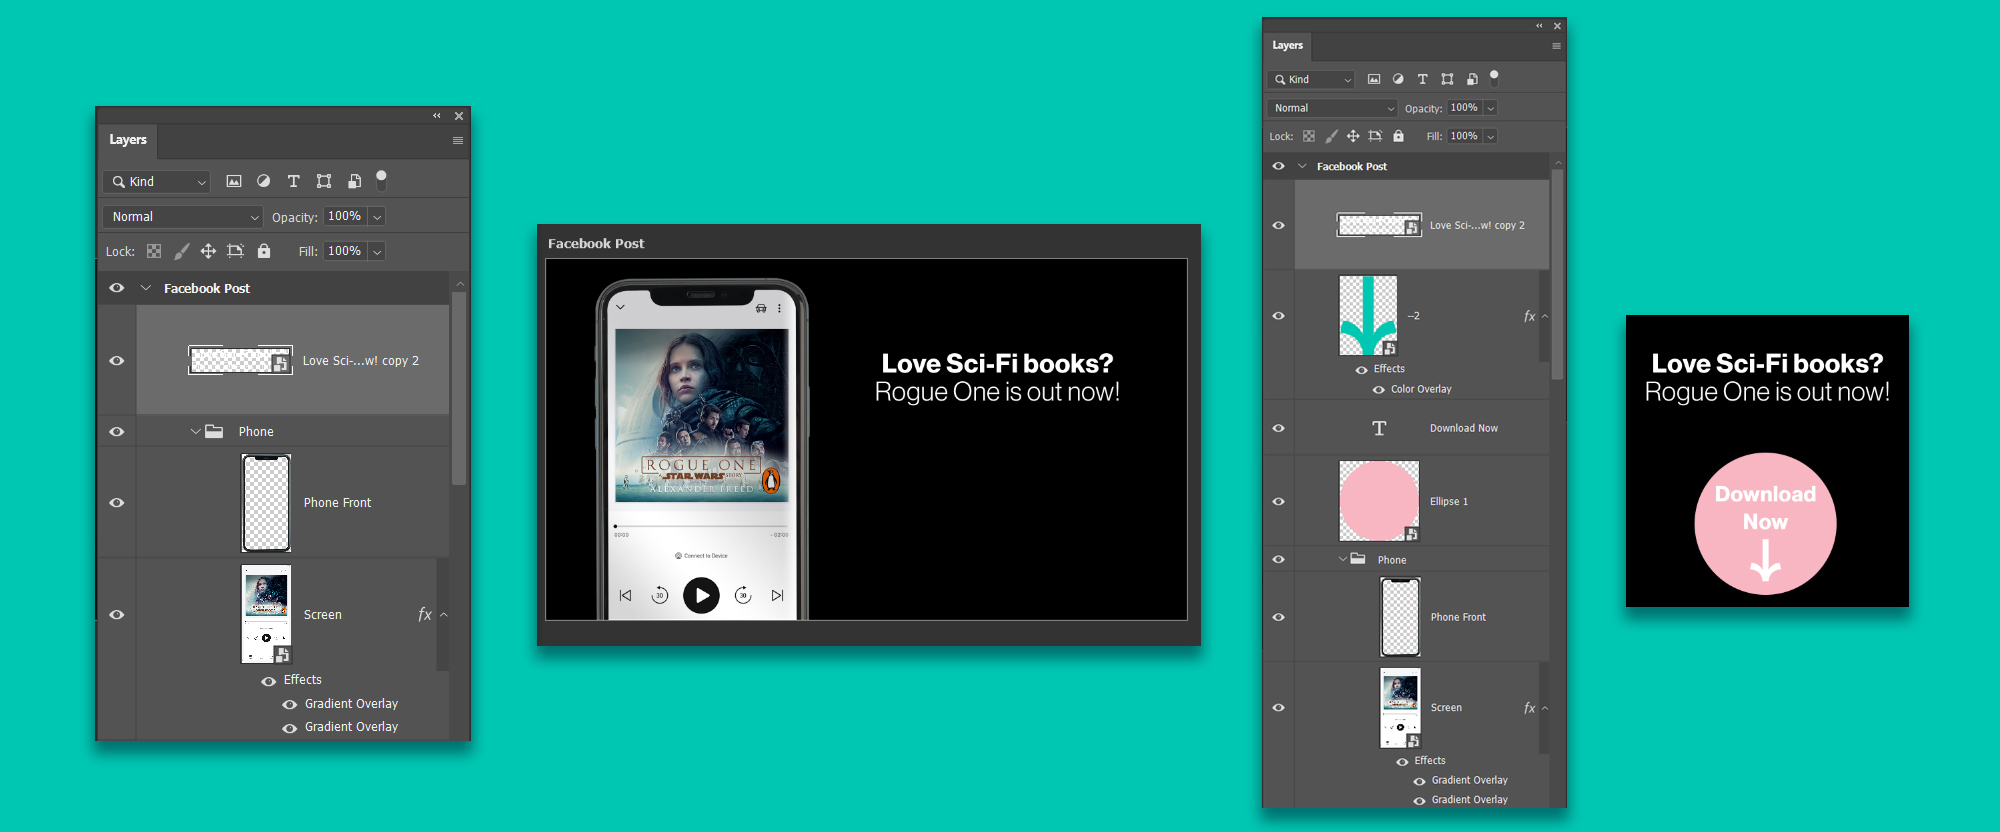
In the layers panel, rename the folder that says Artboard 1 with, ‘Instagram Feed’. Click the Group ‘Instagram Feed’ in the layers panel and you will see a circle icon with a plus in it appear next to each edge of the Artboard. Click the one on the right-hand side. The Properties window will appear. In this window change the Height value to 1920px. In the layers, the panel rename this group to Instagram Stories and make a new layer by clicking the little plus icon at the bottom of the Layers Panel. Now click on the ‘Instagram Stories’ group in the Layers Panel and then click the circle plus icon on the right-hand side. When the Properties window appears, change the width to 1920px and height to 1080px. Re-name this group to ‘Facebook Post’.
Phone Screen Smart Object
Ok, let’s make a mobile phone mockup that allows us to quickly change what is on the screen – so that when your client decides to change it, it will take seconds instead of minutes.
First off bring in a stock image of a mobile phone frame – you can use the one I am using by signing up to my newsletter and accessing the drive folder with all the tutorial assets in it.
Place this mobile phone frame on the Instagram Stories artboard by dragging it into the group folder in the Layers Panel.
Ok, let’s make a mobile phone mockup that allows us to quickly change what is on the screen – so that when your client decides to change it, it will take seconds instead of minutes. First off bring in a stock image of a mobile phone frame – you can use the one I am using by signing up to my newsletter and accessing the drive folder with all the tutorial assets in it. Place this mobile phone frame on the Instagram Stories artboard by dragging it into the group folder in the Layers Panel.
Make a new layer, name it Screen. In the Toolbar click the rectangle tool and draw a rectangle over the phone frame, leaving a little bit of the frame on each side. Then make the corners rounded by dragging on one circle near a corner of the rectangle. If you lose these controls you can get them back by clicking on the rectangle layer, and then click the rectangle tool in the Toolbar.
Now this is the important part – right-click the Screen layer and click ‘Convert to Smart Object’
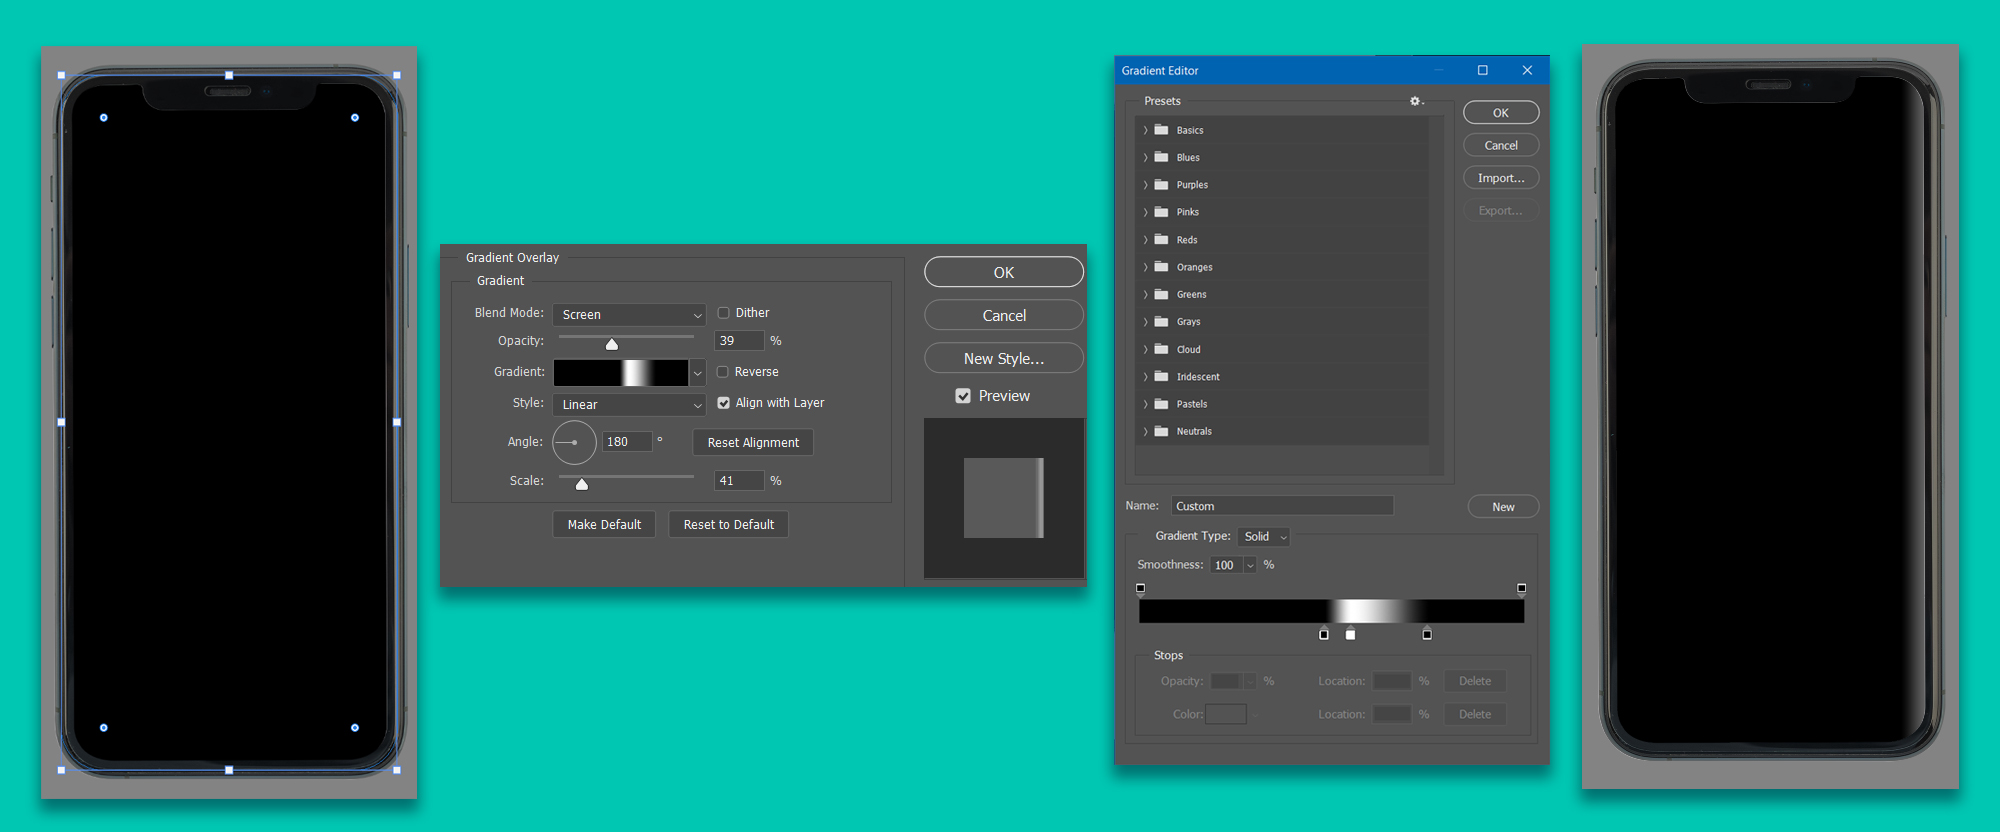
In the Layers Panel, with the Screen layer selected, on the right-hand side of the layer, double click the Screen layer to bring up the Layer Styles panel. We’re going to add two gradients so that the screen has a little shine to it. We’re going to do it this way so that no matter the image we use on the Phone Screen – it will always have the same shine on it. Click on the gradient, it will open a Gradient Editor. In presets click Basic, and choose the black and white one. Then slide the little black box to the middle, slide the white box to the middle also – but leave a little gap between them. Then click on the left-hand side of the gradient to add a new color block. Change this color to black. Click ok – but keep the Layer Style panel open.
Now you can move this gradient around while the Layer Styles Panel is open. So line it up so that it sits nicely just on the edge of the Phone screen and runs down its right-hand side. Change the blend mode to Screen and Opacity to 80. If you have a darker UI screen for your mobile phone you may want to adjust the blend mode and opacity to suit your design.
You can have some real fun with these Gradients so have a play around and see what effects you can come up with.
I will show you one more Gradient. So in the Layer Styles panel, add another Gradient Overlay. Click in the gradient and set it to the preset to Basic, black, and white. Adjust the values as before. Click ok and then set the rotation to 40 Degrees, set the Opacity to 15%, blend mode to multiply. Drag the gradient on the artboard so that it runs from the bottom right corner to the upper left side. Click ok on the Layer Style Panel.
Add a design to the mobile phone screen
Double click the Screen layer. This will open a new PSD with your shape on it. This PSD is linked to your original PSD. In the Screen PSD make a new group. CTRL click the Screen layer so that it selects the shape. Then make sure the group layer is highlighted and click the Mask Layer icon at the bottom of the Layers Panel. This will make it so any screen elements you put into this group are automatically masked.
Now drag the Screen layer into that group. I’m going to add to this screen UI with an Audiobook cover. Feel free to put whatever you like on to this screen. CTRL-S to save the PSD.
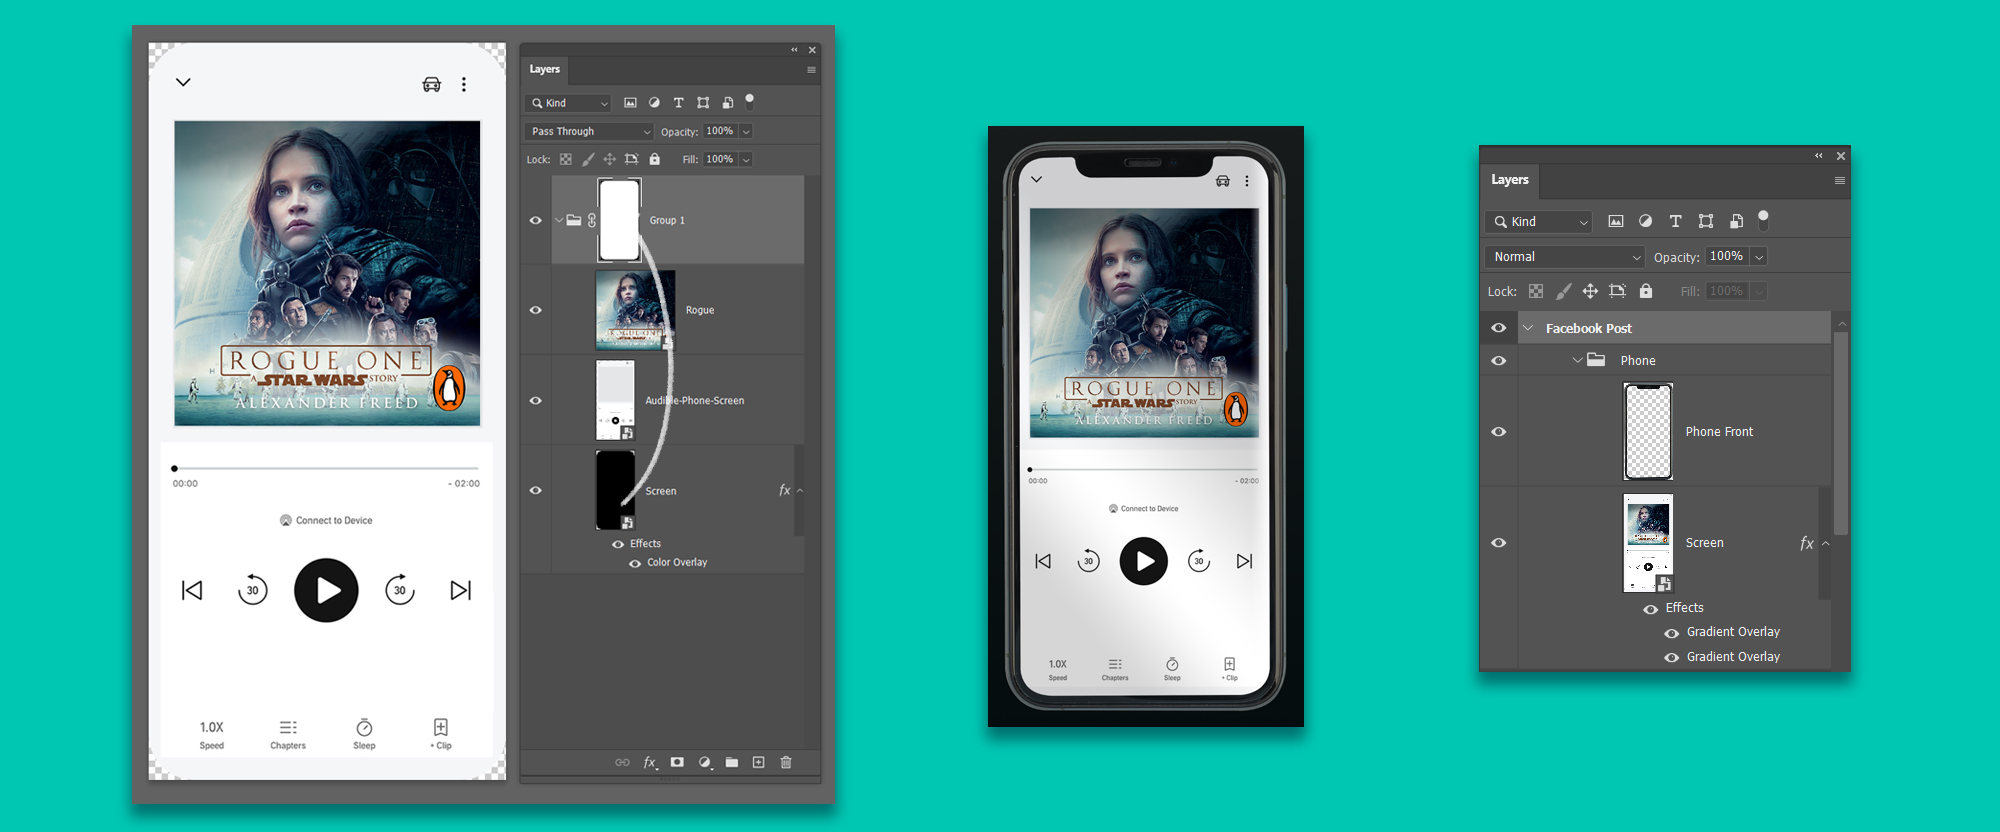
Go back to your main PSD, you will see your mobile phone screen has updated! Group the frame and screen together into a new group, call it Phone. Select the group and do CTRL-J to duplicate the group twice. Drag one group into the Facebook Post, and the other group into Instagram Feed. So now you have a mobile phone in each Artboard.
If you double click the Screen layer, which will take you back to the screen PSD. You can adjust the design in any way, CTRL S. Come back to the main PSD and your screen has updated on all three designs.
Text Smart Object
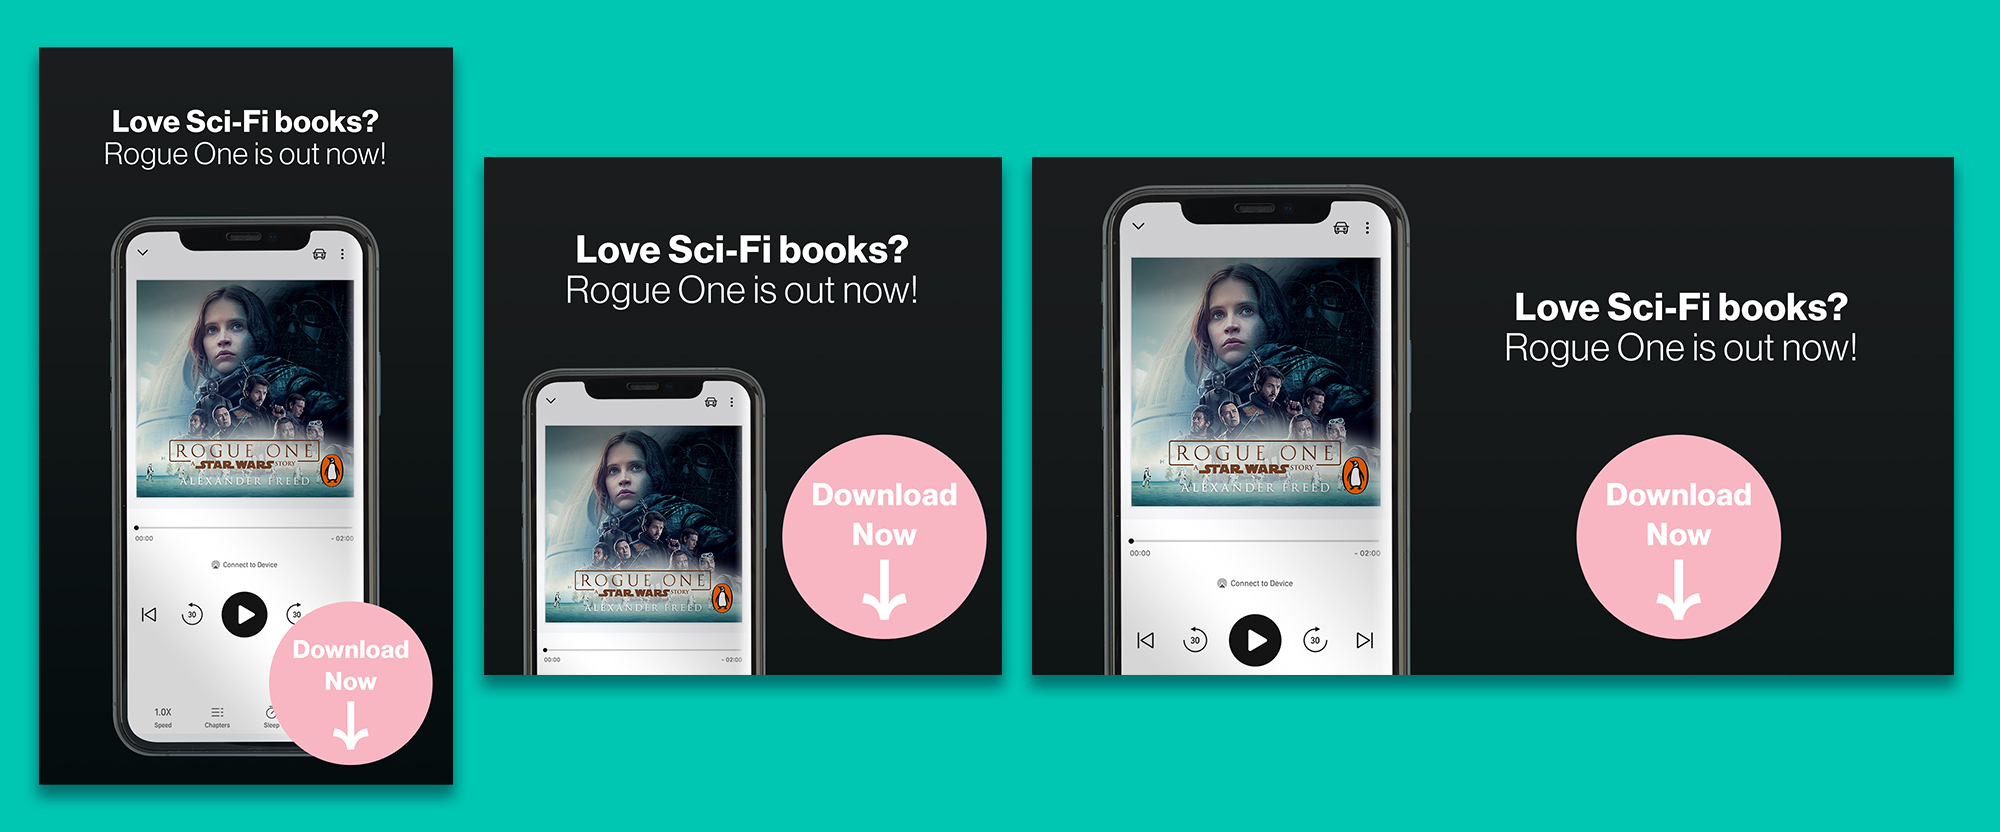
Add in two lines of copy. I am going with ‘Love Sci-Fi books? Rogue One is out now!’ We can set this text to be a Smart Object too. So if we want to update the copy to something else later on, we just double click it, open up its PSD, and change the copy so that it is updated across all three designs. So type your text, set the font and layout as you like. Right-click it and choose Convert to Smart Object.
We can do the same with the Ellipse shape that you can see in my design. If we set this as a Smart Object it will mean we can change its color across all three designs with only a few clicks.
Background color or image Smart Object
On the Facebook Post Artboard group, make a new layer, rename it Background, right-click it and turn it into a Smart Object. Double click it which will open a new PSD with that layer in it. For now, just fill the layer with color – you can change this to any color or image you like and just save it and it will auto-update across all three assets.
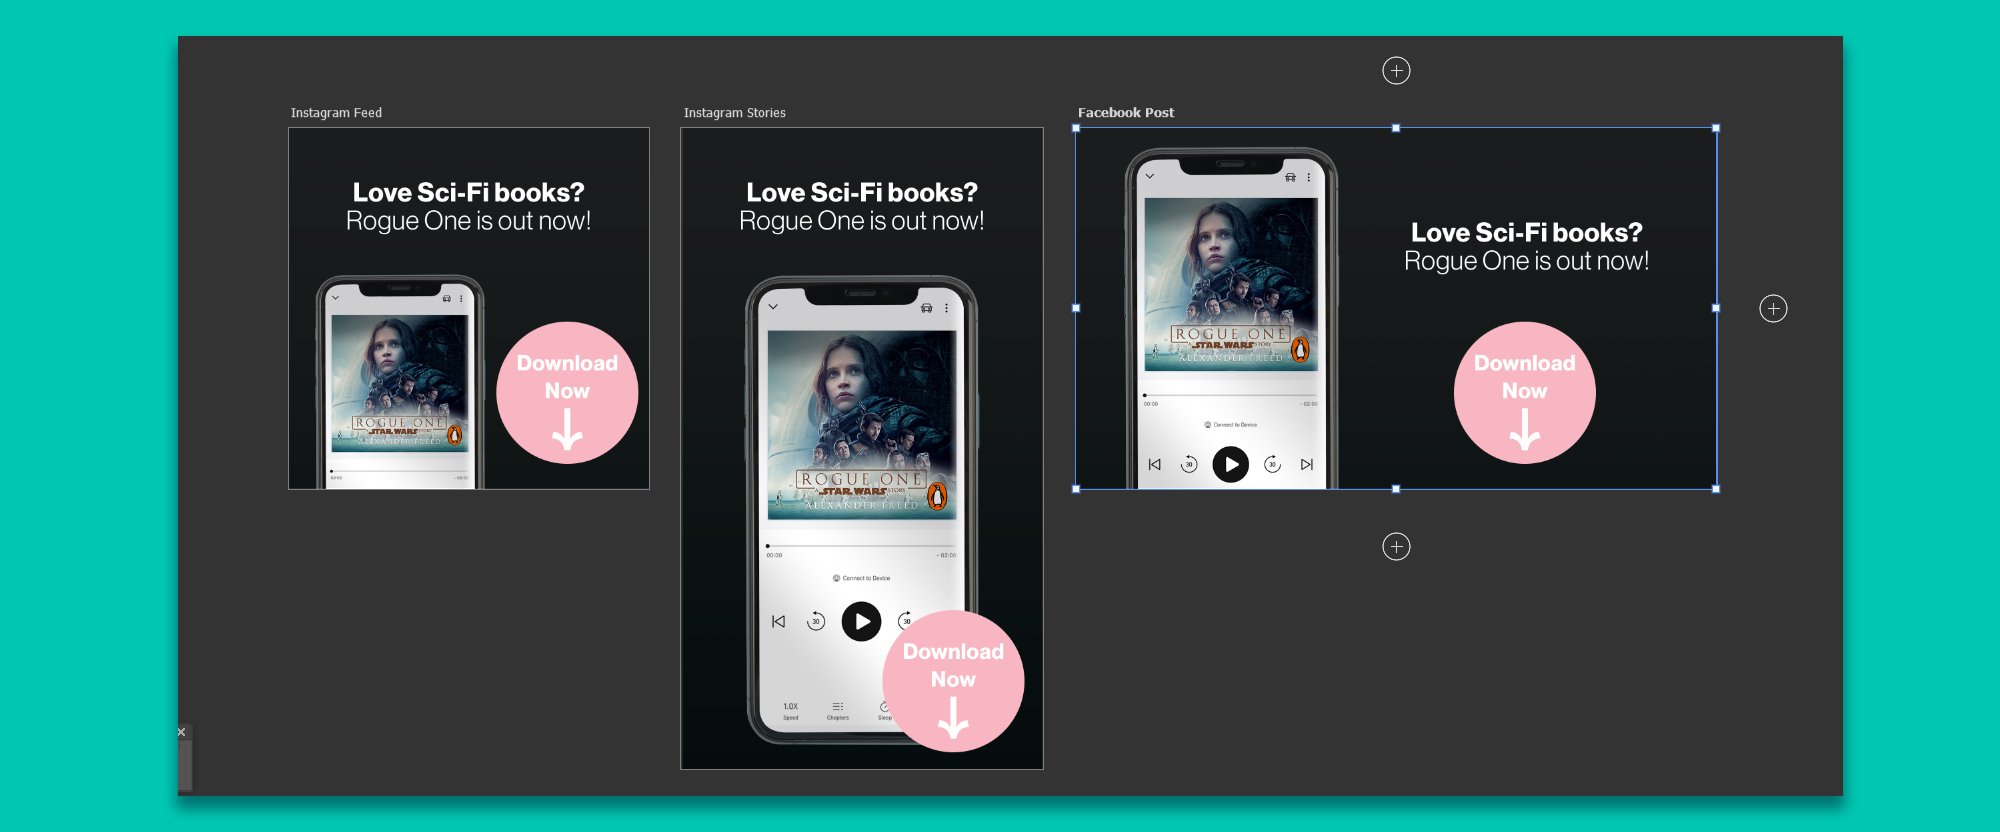
Duplicate across all three Artboards
Now that we have our Smart Objects setup we can duplicate them by selecting them, pressing CTRL-J and then dragging the duplicate layers into the Artboard groups in the Layers Panel. So now we can update our text, phone screen, the color of the ellipse, and background all by double-clicking on the Smart Objects, making a change, saving it and then we will see the change across all three assets. Now imagine we had 15 assets all using the same Smart Object assets – working this way would save you so much time!
Export Assets
To export your assets go File > Export > Artboards to Files. Choose the file location and save them out.
Add a little visual interest with Patterns
Do you want to add a little visual interest to your designs? Patterns can be a great way of doing that and we have the perfect tutorial to help give you complete control over Pattern making in Photoshop: Click here to find out more about Patterns in Photoshop.
6 Responses
Comments are closed.