
Pen Tool Guide: The keyboard shortcut is P.
This Pen Tool Guide for Photoshop will show you the best practices for using this powerful feature. The Pen Tool allows you to draw multiple points that are connected by paths. These paths can be a straight line or they can be curved. It’s a simple concept but can allow you to cut out complex shapes in a very precise and clean way. The Pen Tool also allows you to create vector shapes, rasterized shapes, and draw strokes.
Let’s start by making a straight line with the Pen Tool. Press P on the keyboard to select the Pen Tool. Click once on the Photoshop Canvas and then click again somewhere else on the canvas. You now have a straight-line path. Click several more times to create a shape. If you try to click on the first point you placed you will see a small circle Icon, this means that you will join the Path to itself.
There are a few things you can do with such a path.
- Make a Selection: this is how you would cut out an object from an image
- Stroke Path: This will draw a line along your path, it takes the brush settings from your Brush Tool to do so
- Fill Path: You can turn the inside of your path into a filled shape
- Define a Shape: You can use this to save your path as a shape that you can use again using the Custom Shape Tool

Now let’s make a curve.
With the Pen Tool selected, place a point on your Photoshop canvas, and then place another point – but this time as you place it, hold the mouse button down and drag. The path will become a curve with bezier handles that you can control to move that curve around. If you place the third point down on the canvas and then move the Handles around by holding CTRL or CMD down – this will change your mouse pointer from the Pen Tool to the Path Selection Tool. You can move those Handles around and see how the path is affected.
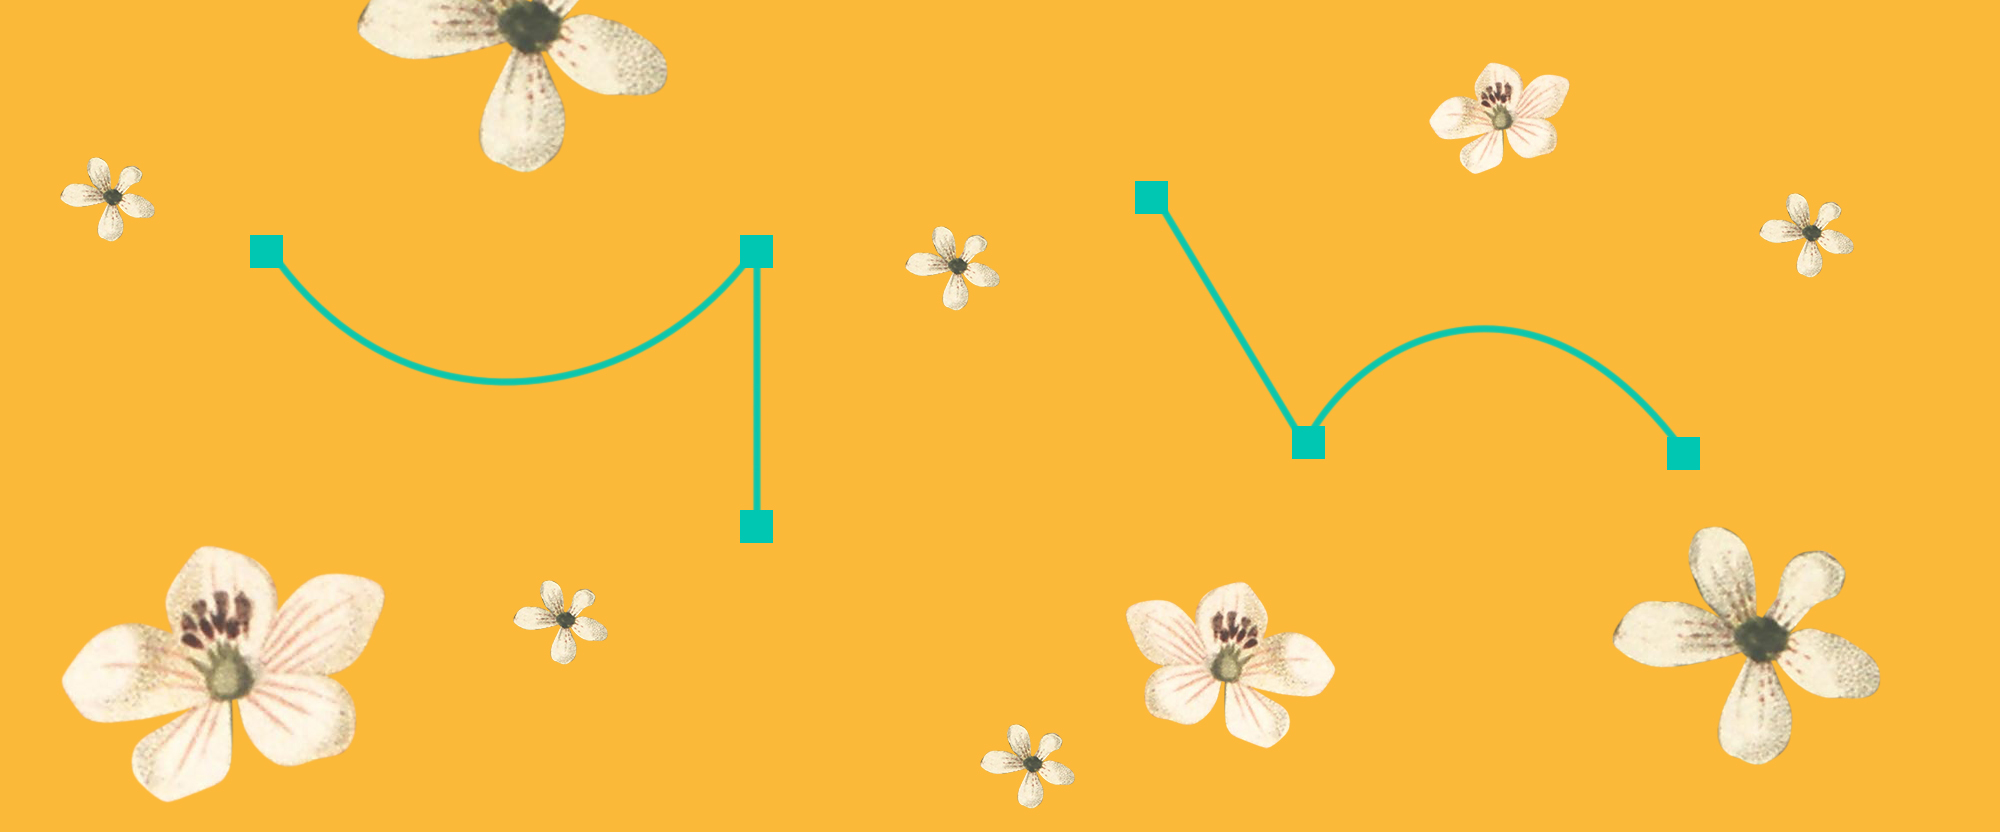
Using One Handle vs Two Handles
If you make a point with the pen tool on a canvas, then make another point and drag out to make it curved, then make a third point and connect with the original first point you will see that you have a semi-circle type shape made with a flat edge and a curve on it. Notice that some of the corners are hardpoints. Notice that the curved edge is using both of its handles and that is giving us the smooth curved edge. Whereas the hardpoints in the corners are influenced by only one handle meaning that we get a hard corner. Both of these types are useful in their own way when creating paths. So it is good to be aware that you can make hard corners by using one handle only, and a curved corner by using two handles.
Breaking Handles
What if we draw a few points and decide that we want one of those points to be curved?
Then we would hold the ALT key down which gives us the ability to add handles that we can make that point into a curve. If we hold down ALT again and click on one of the ends of the Handles we can take control over just that handle. We have broken the handle so that we can control each curve independently of each other. Really useful when creating complex shapes.
Rubber Band
If you want to have a little more insight into what your next Pen Tool point will look like before you place it then you can turn on Rubber Band mode. To do this go to the top menu in Photoshop, where you will see a cog icon next to a tick box that says Auto Add/Delete. Press the Cog icon and tick Rubber Band. Now if you use your Pen Tool you will notice that you can see what your Pen path will look like before you place the next point. This can be really useful if you were having difficulty figuring out where to place your next point.
Why using fewer Pen Tool points is better
One tip which has helped me a lot with creating clean paths with the Pen Tool is to use fewer points. This will give you a smoother path, use the various tips above to help give you control over your points.
The way I use the pen tool when drawing a shape is to place points where there is a dramatic change in the shape. I keep all my points straight and not curved to start with. Then once I have placed the minimum amount of straight points, I go in with the ALT key to add any curves that are needed. This way always seems the fastest in creating shapes or cutting out an object.
Curvature Pen Tool
In the Toolbar hold down the Pen Tool icon to reveal other Pen Tools. Select the Curvature Pen Tool. It acts a little differently from the previous one. If you create three points using the Curvature Pen Tool and it will automatically create a curved path. You can click on a path point and then hit delete if you want to remove it. To add a point, just click on the path with your Curvature Pen Tool. Double click a point to switch it from curved to hard edge. It is worth playing with this tool as you may find it more intuitive than the standard Pen Tool.
In the Pen Tools toolbar you will also notice Add Point / Delete Point Pen Tools – these should be fairly self-explanatory as they just add or delete path points that you have placed. You will also find the Convert Pen Tool, this is the same tool that we use when we hold down ALT.
Pen Tool Short Cuts:
- P: Activates the Pen Tool
- ALT: Convert Pen Tool which converts a point to a curve, converts to a straight edge, and breaks handles for independent positioning.
- CTRL: Moves path points and can move the handle points.

I want to show you one last trick which will help when using the Pen Tool to cut out objects. Something you may notice when cutting objects out with the Pen Tool is that the edge is just too perfect. It’s a hard edge that when layered onto other photos or designs can feel a little unnatural. In the photo above I am cutting out a glass from its background. I am using the various techniques and shortcuts that I covered above to draw out my path. Then once I have finished with the path around the object I can right-click and go Make Selection to select the object. Now go on to the top Photoshop Menu and choose Select > Contract Selection and enter the value of 1. This will bring in your selection by 1 pixel, this helps get rid of any fringe pixels that can make your cut-out look a little unnatural. The next step is to go Select > Feather and then enter the value of 0.5. This gives a little edge blur, just so that it helps sit on to a new image perfectly. I find that the value of 0.5 is the sweet spot where it helps give you a natural blur to the edge without it being too much. And now you can Mask the layer using the Mask icon on the Layers Panel.
Improve your workflow
Now that you have a better understanding of the Pen Tool, it might be a good time to improve another area of your workflow by learning about Smart Objects in Photoshop. These are the best way to make mockups or templates for all sorts of different Photoshop projects. Learn more about Smart Objects here.
2 Responses
Comments are closed.