Tutorial Series: Design Vinyl Album Art Graphic Design Case Study
How to Design Vinyl Album art mockups in Photoshop is part of a larger tutorial series that we have at The Design School. This series will help you create a professional portfolio piece that will help you land work. We will help you design the artwork for the album cover, create a vinyl mockup, social animations, and finally a landing page that will show a design case study of your work. When you are just starting out as a Graphic Designer it can be hard to know what to put into your portfolio and how to lay it out. Follow along with this tutorial series and we will show you the way to building a great Graphic Design Portfolio!
Childish Gambino Album Artwork
We will be using this image from the previous tutorial in this series where we created the album artwork for Childish Gambino’s 3.15.20 album.

I highly recommend that you go through that tutorial first as you will learn a lot of techniques that you can use in other projects. However if you already have album artwork created and want to use that instead, then you absolutely can – just make sure your album artwork is 3000x3000px dimensions. It is good practice to work at high resolutions all the way through the design process and then scale it down for output to websites and social media. This way we keep as much pixel information within the image as possible.
Read: How to design an Album Cover for Childish Gambino
Photoshop file setup
The artwork that we created in the previous tutorial was 3000x3000px so I want to create a Photoshop document that is larger than this so that we have a little room to play in. We will build our Photoshop mockup of the vinyl album cover in this document and then create additional Photoshop files for other mockups that we want to create later on.
As you can see in the image, the settings for the file are:
- Width and Height 3500px
- Resolution 300 DPI
- RGB Color
- Background Color: #b7bcb5
- Color Profile: Working RGB
- Square Pixels
The grey background we set up here will help give us a neutral background to work with. We can change it later if we want to have a different look for the creative.
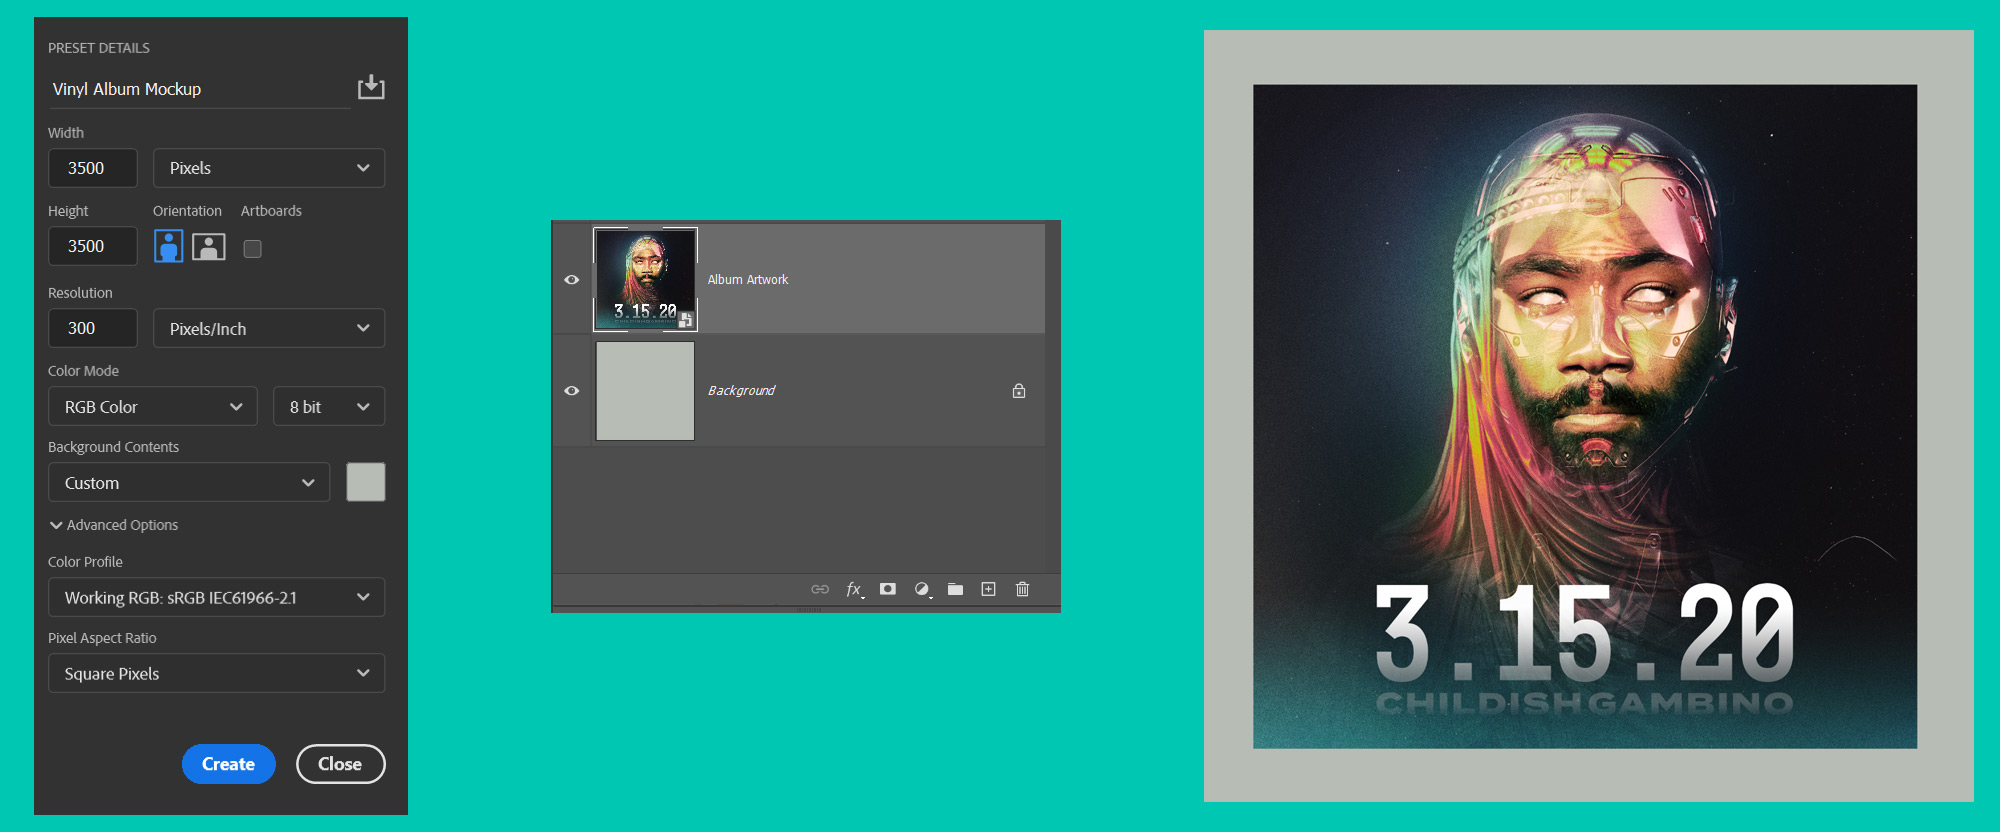
Design the Vinyl Album Cover
The first thing we need to do is to drag our album artwork onto our Photoshop Canvas. As mentioned previously this was from a previous tutorial in this series, so if you want the same design then complete that tutorial first.
Once we have dragged our Artwork into Photoshop we can start adding filters to make it into an Album Cover.
There’s a variety of ways that we could go about doing this. But I always try to make any edits as nondestructive as possible. This means that I can make a change to an image and then go back whenever I want to alter it if I needed to.
Smart Objects
To keep this workflow nondestructive we will make our album artwork a Smart Object. If you want to find out more about Smart Objects then you can check out my tutorial on it here.
Right-click on the Album Artwork and click Convert to Smart Object. Now any effects and filters we apply to this image will be listed below it enabling us to make edits to those effects anytime we want.
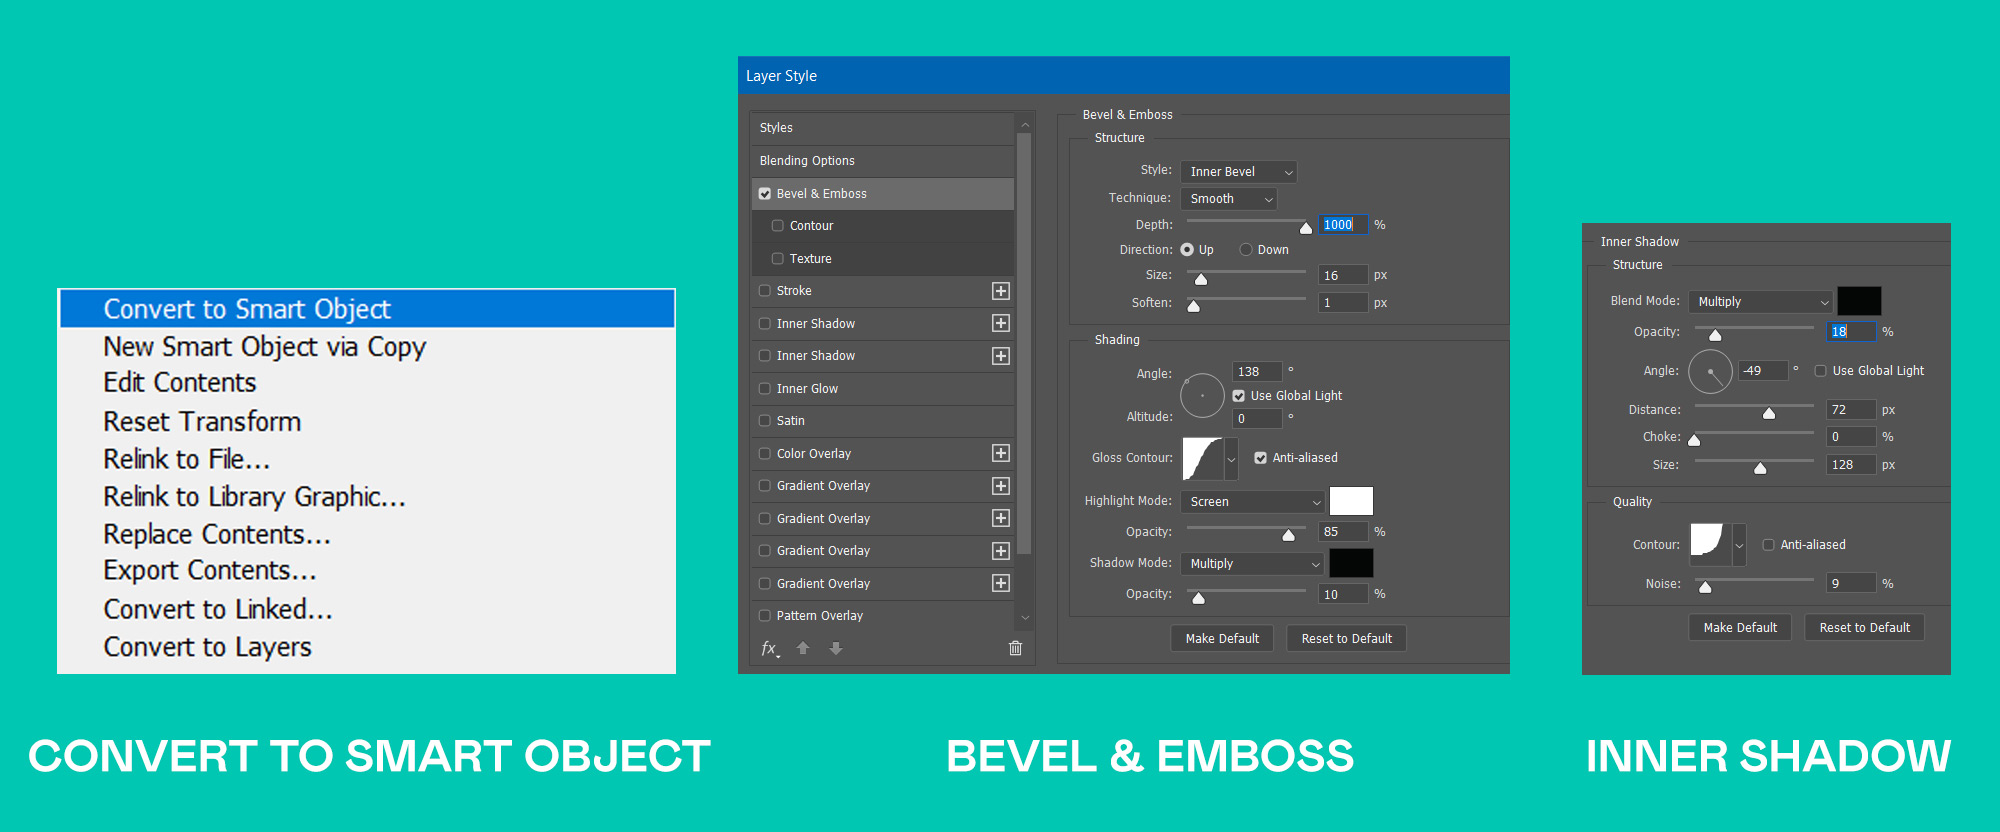
Layer Styles
Bevel & Emboss is the first Layer Style we will use to help create our Vinyl Cover. In the Layers Panel, click on the Album Artwork layer and then double click on its right-hand side. This will open up the Layer Style Panel. At the top of the list on the left, you will see Bevel & Emboss. Tick this check box and then input the following values.
- Style: Inner Bevel
- Technique: Smooth
- Depth: 1000
- Direction: Up
- Size: 16
- Soften: 1
- Angle: 138
- Use Global Light
- Glass Contour: Use the last contour in the drop-down menu
- Highlight Mode: Screen
- Shadow Mode: Multiply
- Opacity: 10%
Click OK and you will see that your album has an edge to it now.
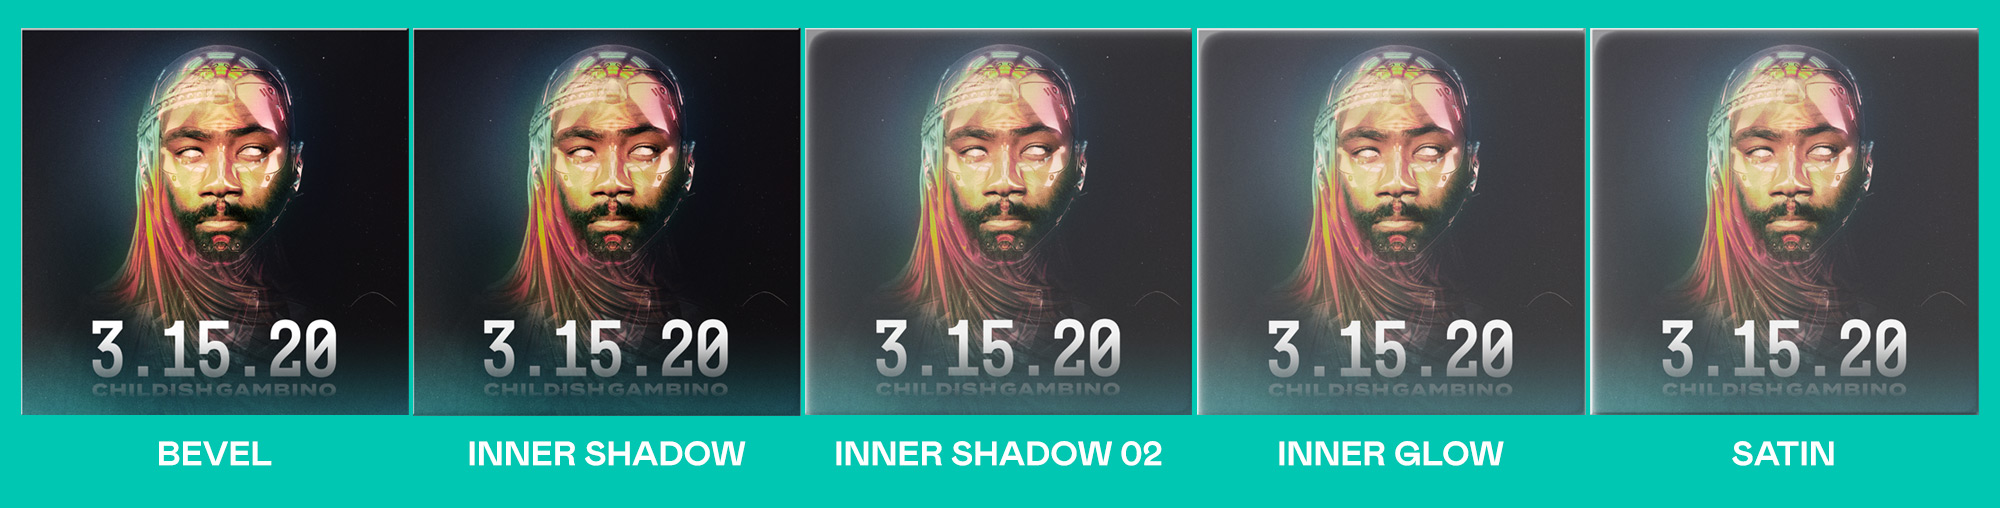
Inner Shadow: Double click on the Album Artwork layer to open up the Layers Styles Panel again, and this time tick Inner Shadow. We want to create a feeling of depth to our artwork and as we add more of these Layer Styles we will see the album artwork take shape.
- Blend Mode: Multiply
- Opacity: 18%
- Angle: -49%
- Global Light: no
- Distance: 72px
- Choke: 0%
- Size: 128px
- Contour: In the drop-down, choose the fourth one along the top row
- Noise: 9%
Inner Shadow 02: Without pressing ok to the previous Layer Style, we can just add more Layer Styles by ticking the checkboxes on the left side. I want o add another Inner shadow but this time change the black color to white so that we get a soft glow.
- Blend Mode: Screen – color: WHITE
- Opacity: 58%
- Angle: 138
- Global Light: yes
- Distance: 100px
- Choke: 0%
- Size: 177px
- Contour: In the drop-down, choose the fourth one along the top row
- Noise: 5%
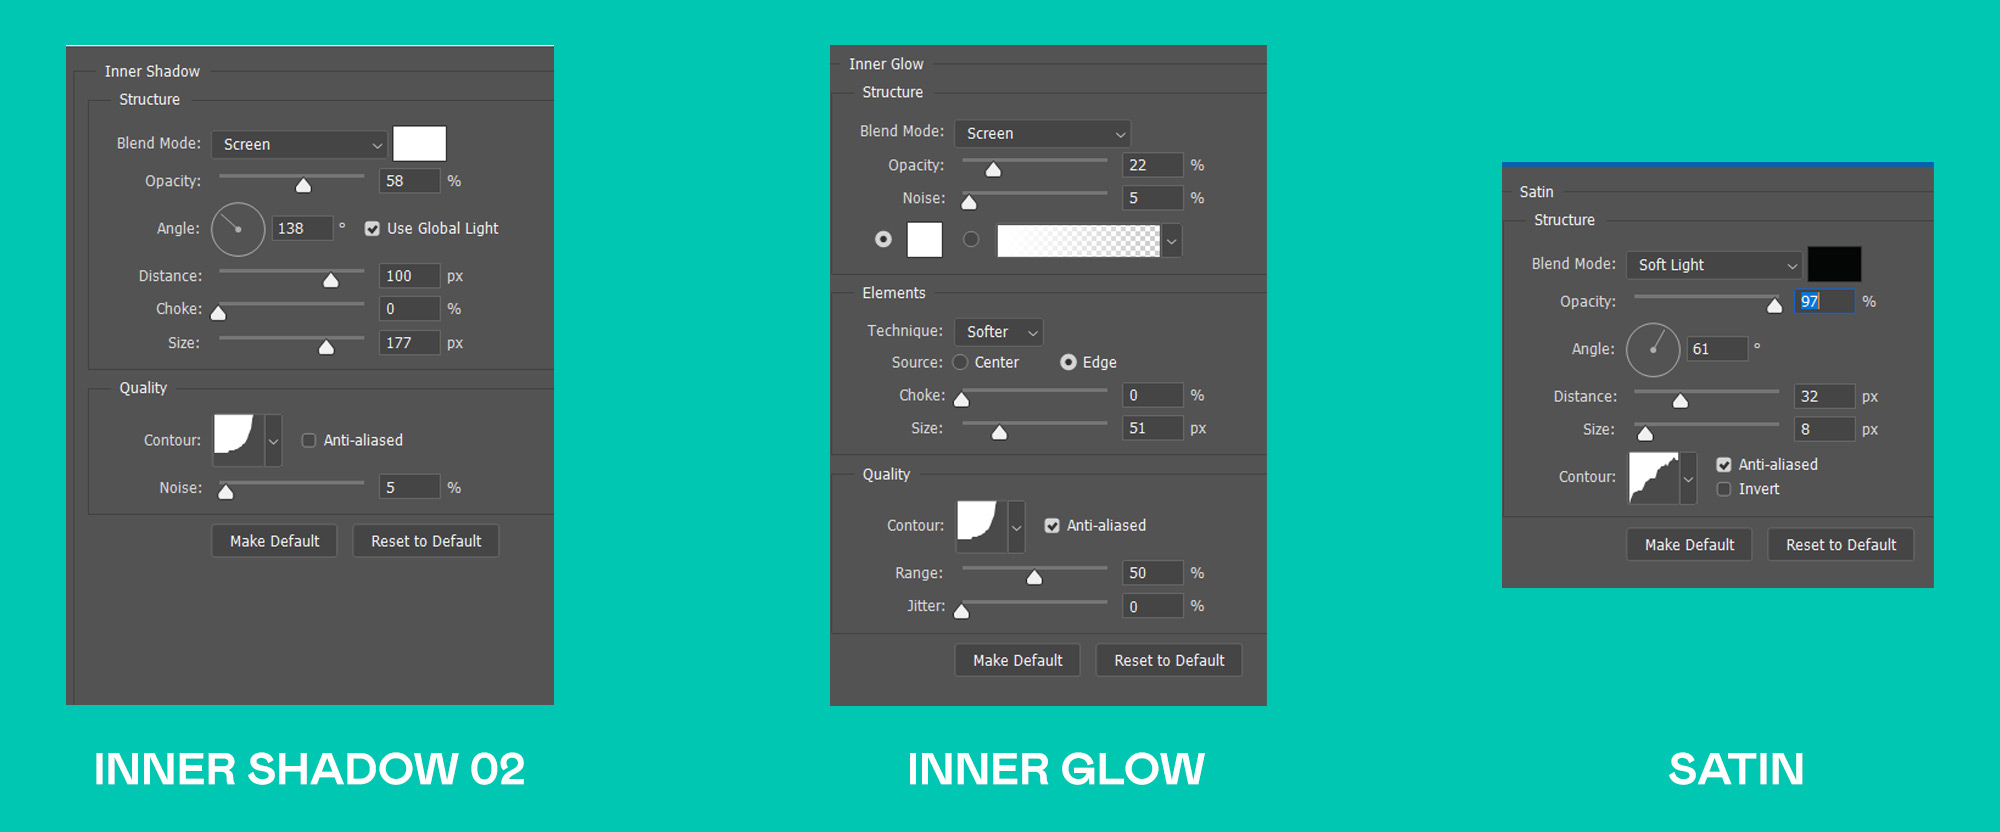
Inner Glow: With Inner Glow, I want to add a soft light to the entire Album Cover – so tick the check box next to Inner Glow and input these values.
- Blend Mode: Screen – color: WHITE
- Opacity: 22%
- Noise: 5%
- Technique: Softer
- Source: Edge
- Choke: 0%
- Size: 51px
- In the drop-down, choose the fourth one along the top row
- Range: 50%
- Jitter: 0%
Satin: With Satin I want to add a small shadow to the bottom of the Album Artwork
- Blend Mode: Soft Light – color: BLACK
- Opacity: 97%
- Angle: 61%
- Distance: 32px
- Size: 8px
- Contour: second row – rounded steps
- Anti-Aliased
- Invert: No
Curves Adjustment Layer
I am noticing that my image now looks a little too washed out.

To counter this I am adding an Adjustment Layer of Curves. It has one single point near the bottom of the RGB curve, pulling it down into a darker image. You can see the before and after in the image. It’s a subtle difference, but most of these small tweaks to the image are subtle but they add up into being a realistic Album Cover Design.
Plastic Wrap
For my album cover, I want it to feel like it’s brand new with its plastic wrapping still on it. To get this effect I am using an Adobe Stock image of a Plastic Wrap Overlay which you can get here. If you click the banner below and sign up to Adobe Stock you get ten free images – which means you can get this one for free! Throughout my 15 year career as a Graphic Designer, I have used Stock images almost daily to create all kinds of professional work. Whether it’s from places like Adobe Stock or free sites like Pexels, if you go Pro you will be using stock so it’s a good investment to make.
So download the above Adobe Stock image or find a free alternative online. We want to position this plastic image over our vinyl album cover.
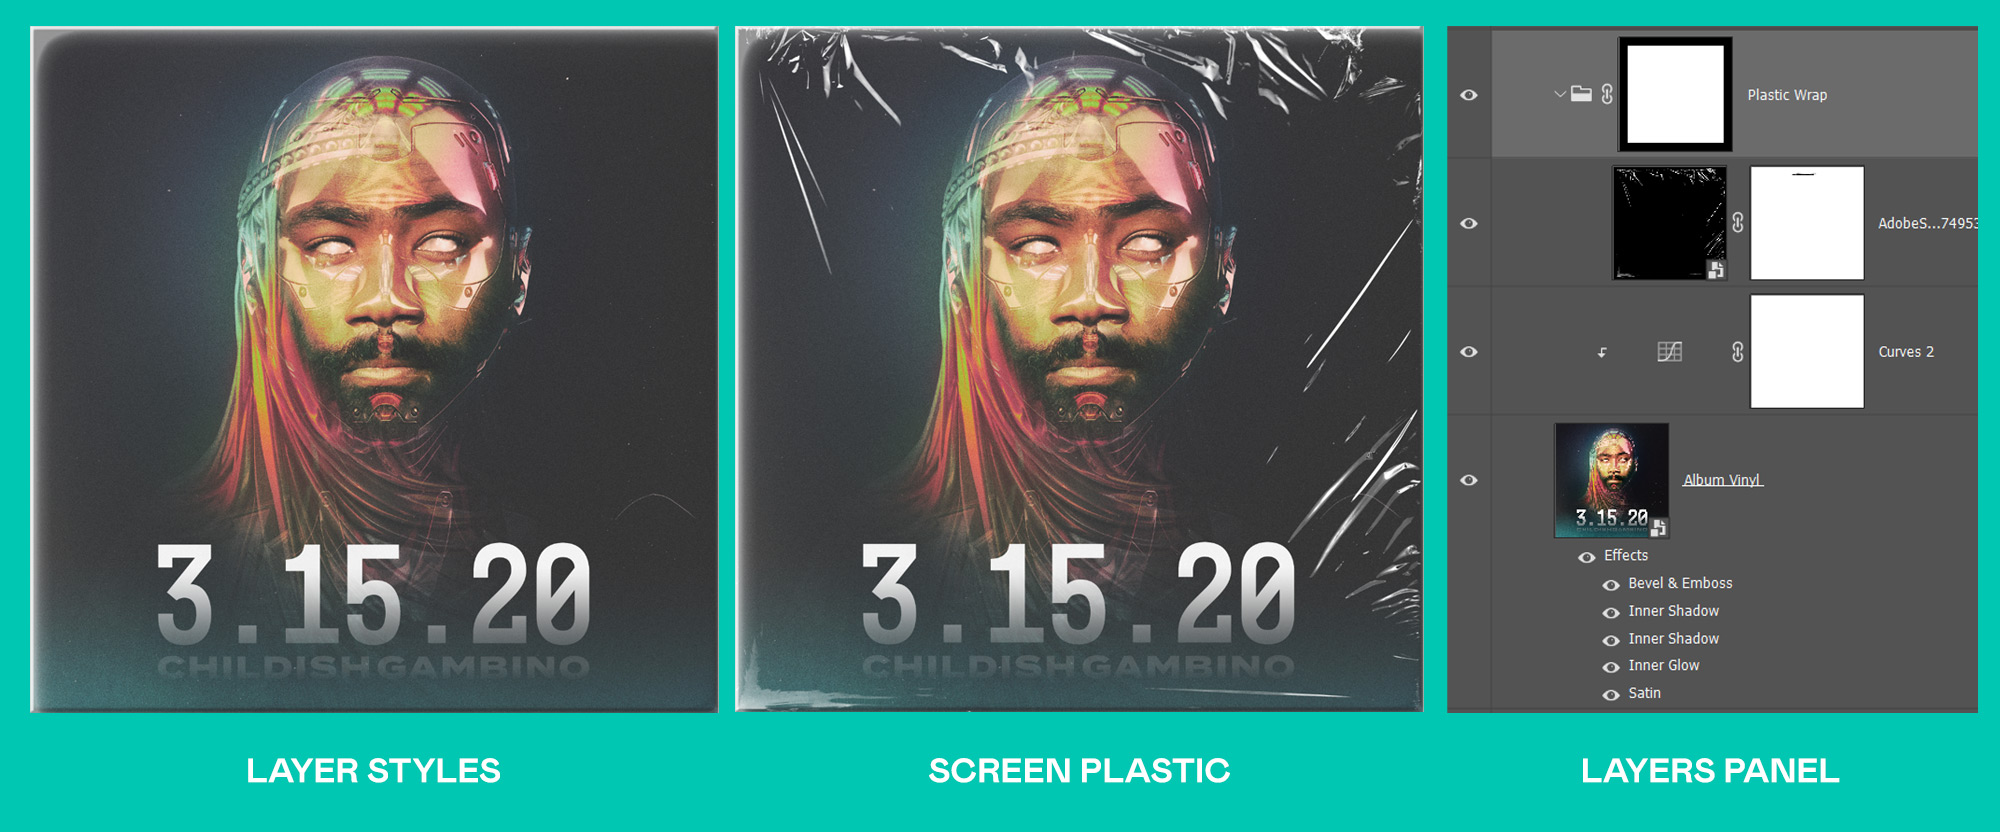
Set the Blend Mode to Screen.
Now the black parts of the texture disappear and we can see the plastic over our artwork. You can add a Curves Adjustment Layer and Clip it to this texture if you wanted, you can control how much reflection you can see by moving the curve around. For now though I will just stick with the plastic just on the Blend Mode Screen as I think it suits the look that I am going for.
One final thing I want to do is to make a new group and put the plastic layer into it. Then CTRL click the Album Vinyl Artwork layer in the Layers Panel so select it’s shape. Then click on the new group you just made and click the Mask icon at the bottom of the Layers Panel. This makes it so that you can still move and scale your plastic in anyway you like, but it is masked by the shape of the album artwork so you don’t get any strange floating bits of plastic outside of the cover.
Tip: If you are using different Album Artwork from me, you may find that some of these values do not look quite right to you. As a professional designer you will be tasked with solving visual problems on a daily basis. So I highly recommend playing with the Layer Styles with your chosen artwork to see if you can create a look that you are happy with. You are the designer here, so make choices and solve problems that you think work well with the artwork you are using.
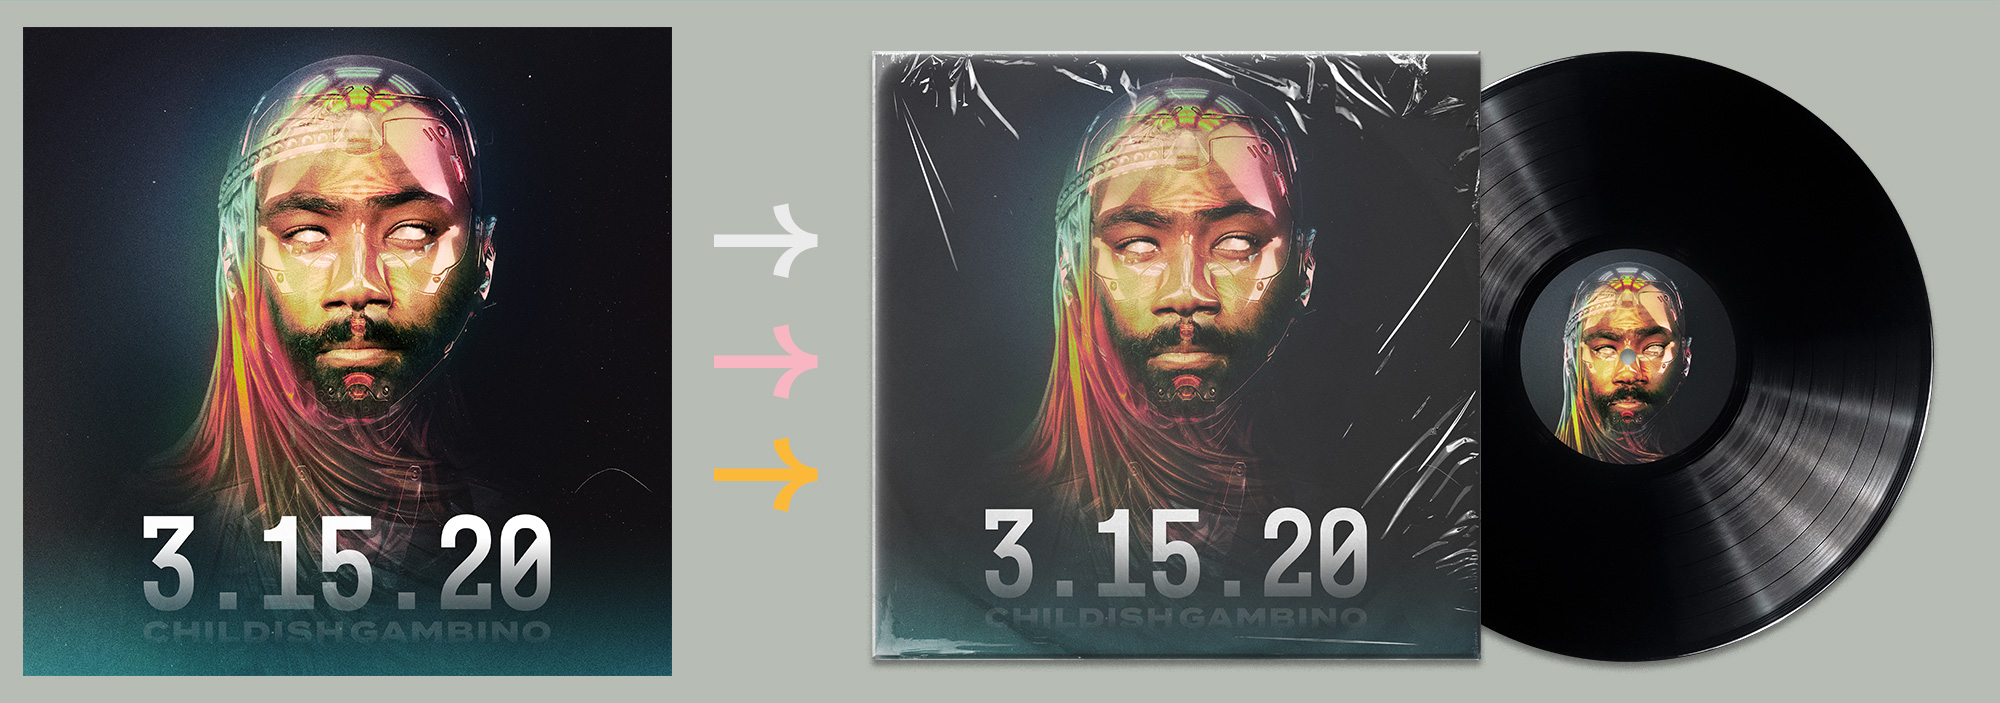
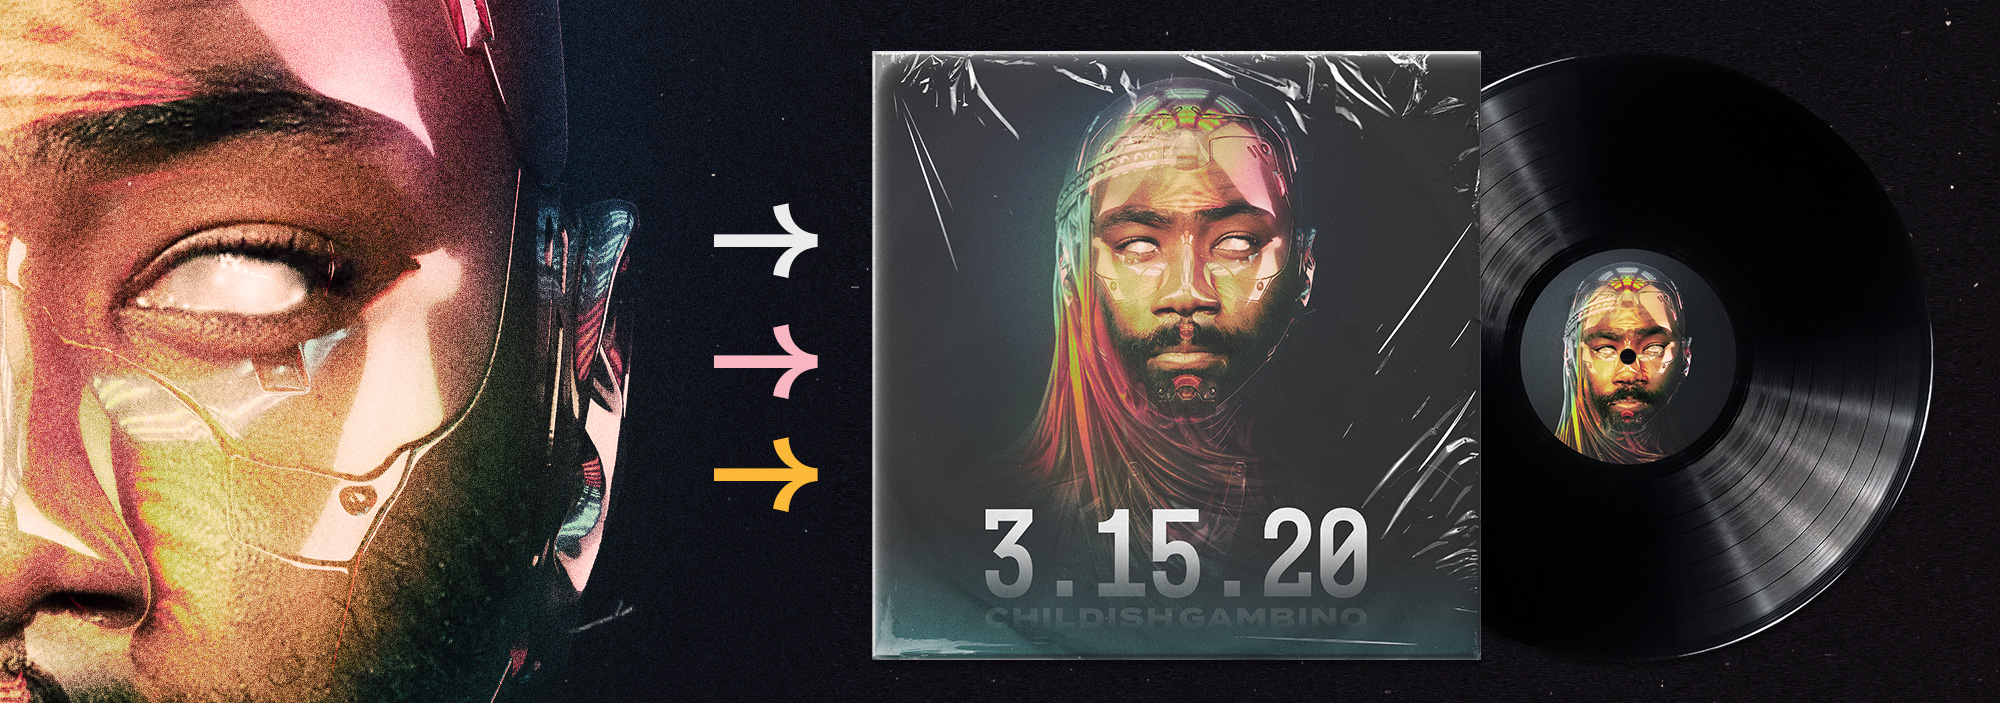
Creating an Aged Variant of the Album Cover Mockup
When we come to create the landing page which will be the last part of this tutorial series, it will be great to show some different variations of how this album artwork could look. So I want to make a variant which looks a little aged. The way we will make it will mean that we can just adjust the Opacity and control how aged it actually looks. Which is cool!
I will be using part of this image from Adobe Stock Images. Again if you click the banner below then you get ten free images from Adobe Stock which will be enough to complete this whole tutorial series and more. But if you don’t want to sign up then there’s plenty of textures for free on sites like Pexels.
So I only want to get the brown paper wrapping from this photo and ignore the rest. Drag the Adobe Stock image into the Vinyl Album design. Set the Opacity to 50% so that you can see through the image to the layers below. We want to scale this image so that the brown paper part is the same size as the main vinyl cover. With the Marquee Selection Tool (M on the keyboard) hold Shift to keep a square ratio and draw a square around the brown paper part of the image. Once you have a selection, CTRL-C and CTRL-V to copy the selection into a new layer. The reason why we are being destructive rather than non-destructive here is that I know that I do not want any of the image that comes with the brown paper packaging.
Set the blend mode to Multiply and Opacity to 100%.
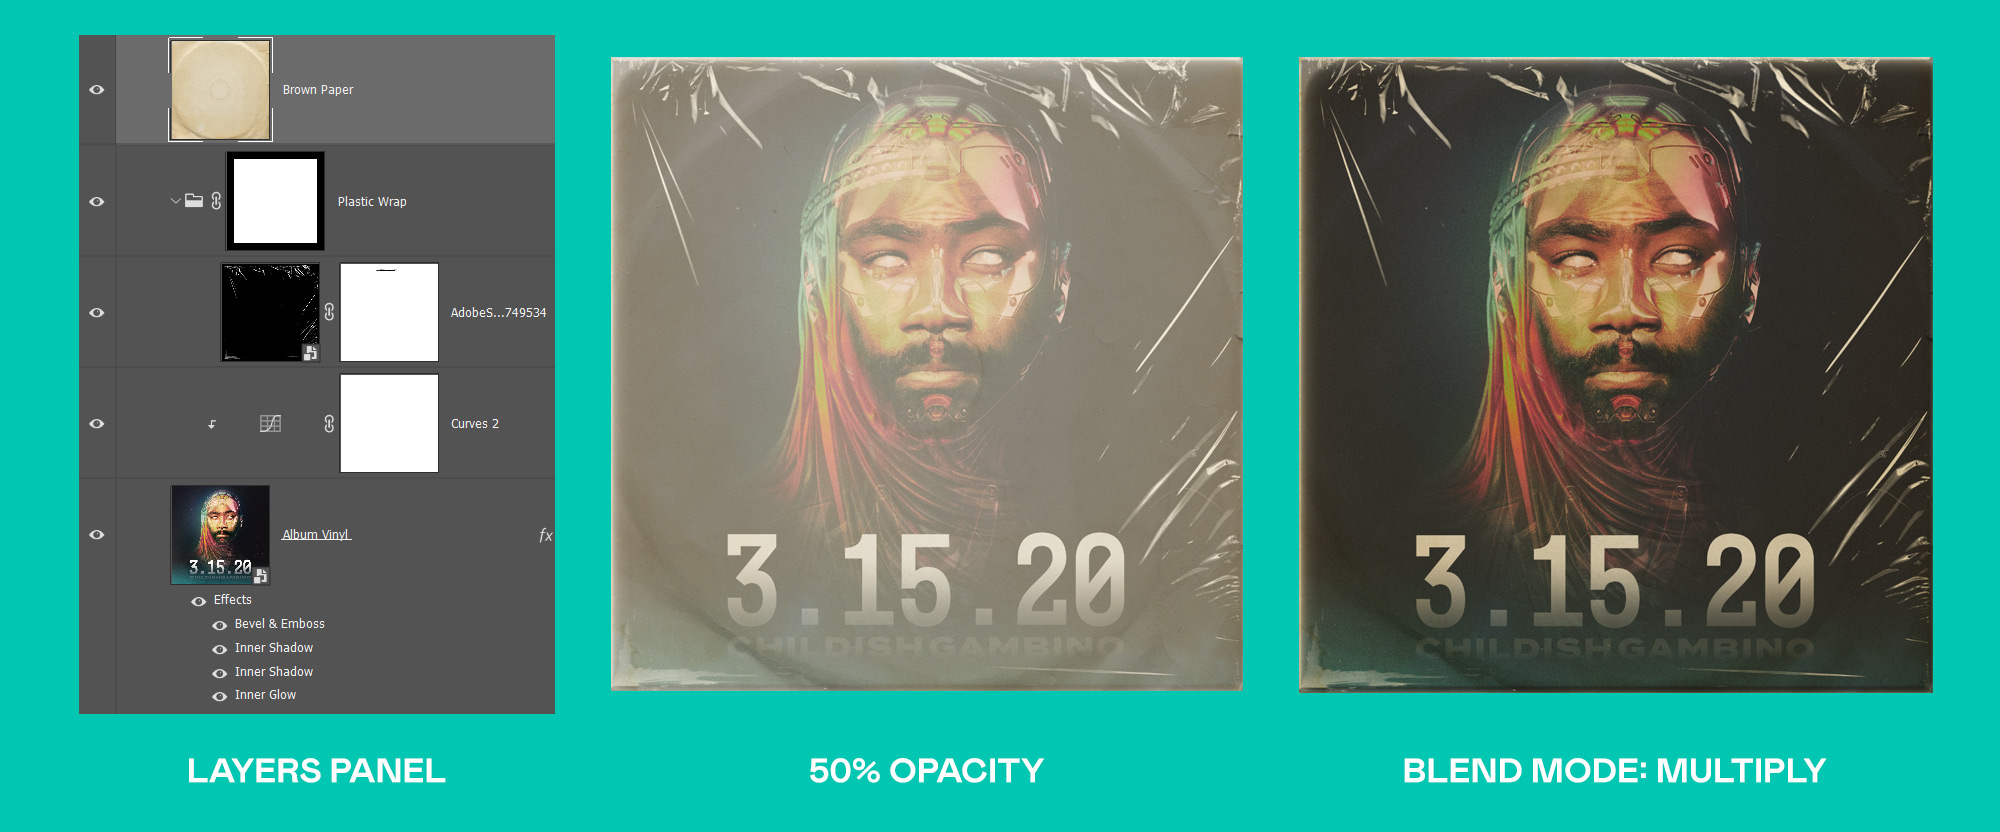
Now you will see that the image looks too orange, the brown paper has colored our artwork a little too much. I want to adjust it so that we get a more even color tone.
Adjustment Layers
To control the color of the brown paper we will use a Hue and Saturation Adjustment Layer. At the bottom of the Layers Panel is the Adjustment Layer Icon – click this and choose Hue and Saturation. It will create a new layer – make sure that it is directly above the Brown Paper image. Double click the Hue and Saturation layers icon to open the Properties Panel. Push the Saturation slider all the way to -100. This turns our image black and white. We only want the paper to be black and white so be sure to click the Clipping Mask icon at the bottom of the Properties Panel – this makes sure that this Adjustment Layer only controls the layer directly below it.
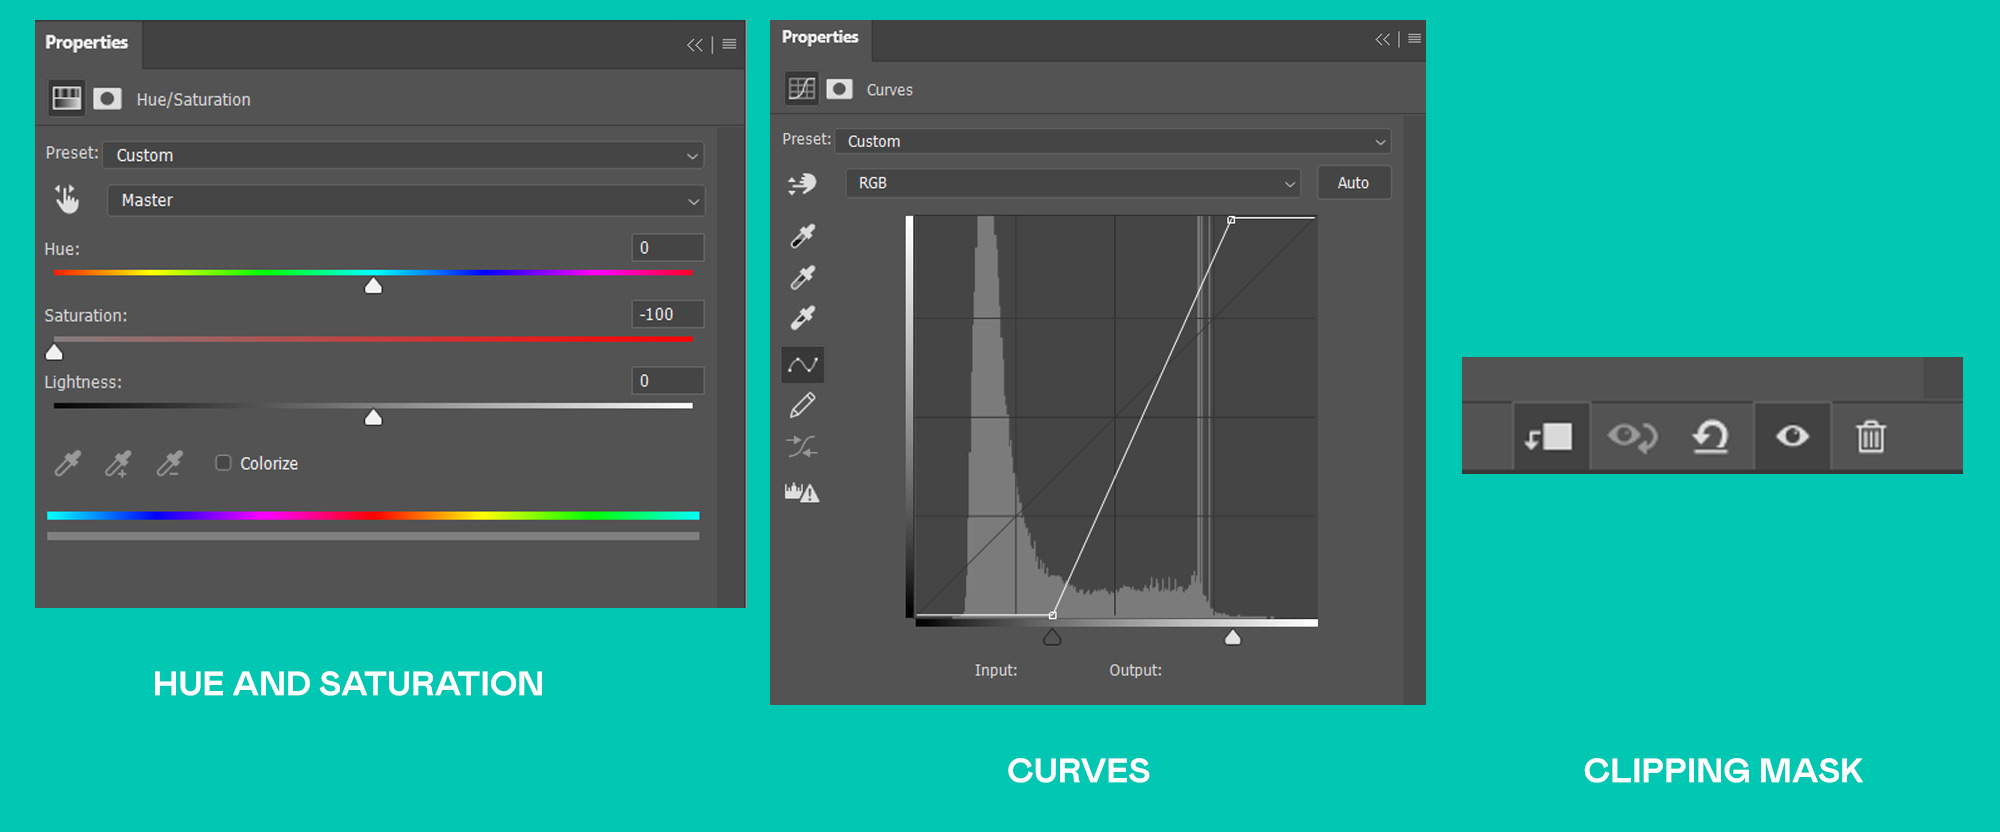
Now go to the bottom of the Layers Panel and choose another Adjustment Layer. This time we will choose curves. Make sure this adjustment layer is directly above the Hue and Saturation layer. Then go into the Properties Panel and click the Clipping Mask icon at the bottom of the Properties Panel. Change the curves to match the image above. This helps to deepen the shadows and provides us a nice effect.
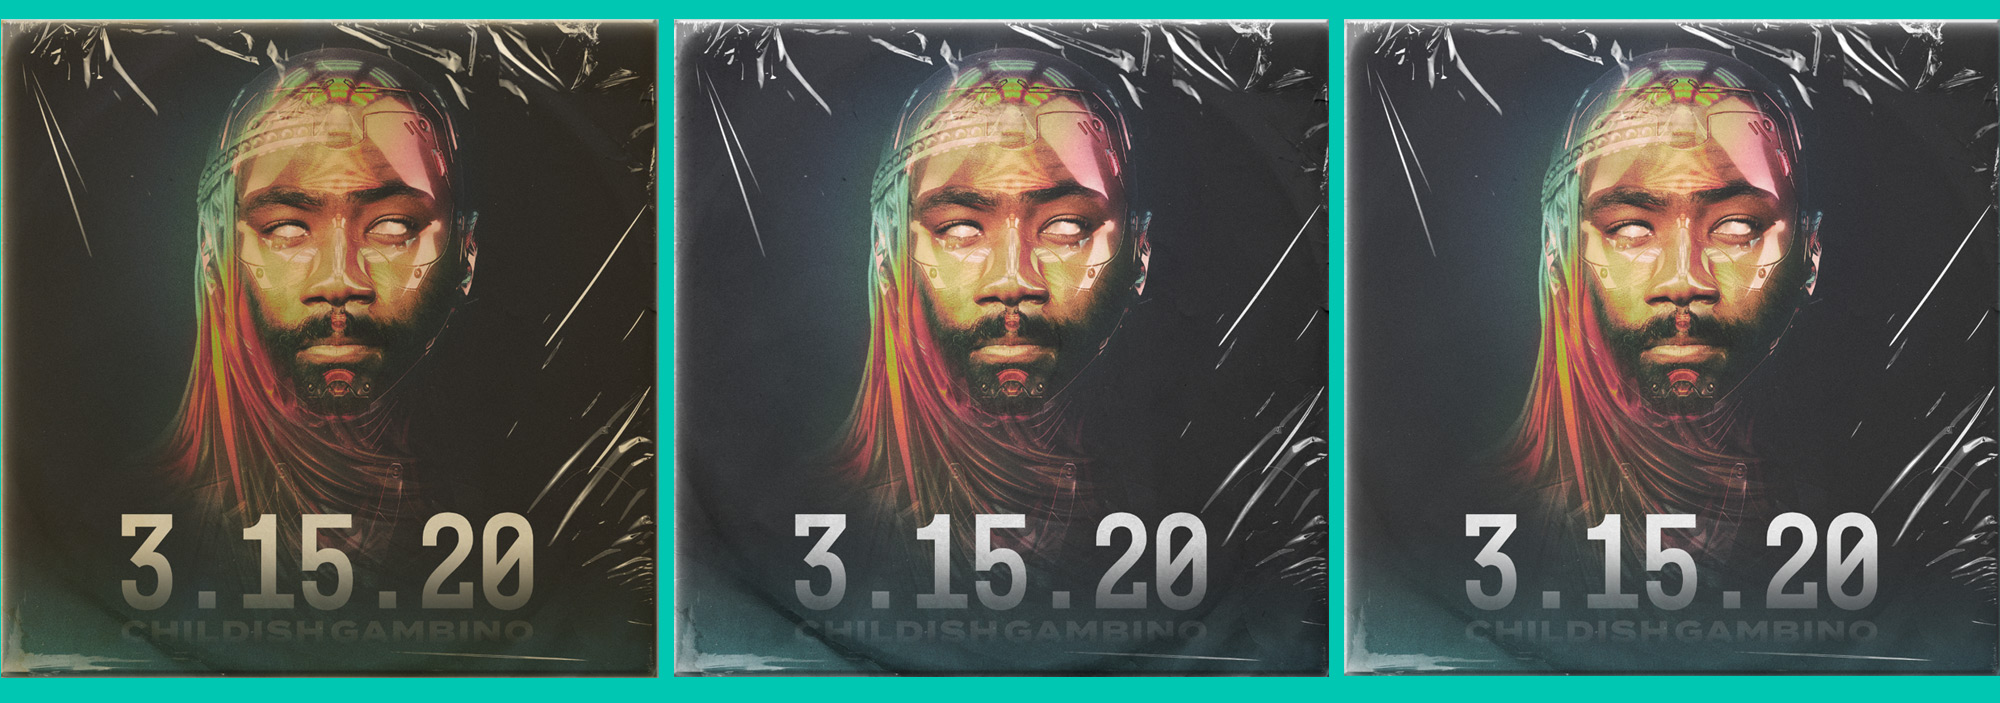
We can change the amount of aging by just changing the Opacity of the brown paper image. The one on the far right is 50% Opacity whereas the middle is 100% Opacity.
Depending on your own personal preference you can choose how much again you want to show. You can even play with the blend modes and see if there is one that you would prefer.
Vinyl Disk Design Mockup
To create the vinyl itself we will be using this image from Adobe Stock Images. You can find alternative free images on Pexels and other sites. Again if you want to get this image for free then Adobe gives you ten free images if you sign up to their Adobe Stock plan, so click the banner advert below to get the plan and your free images!
Start by turning off the other layers in your Photoshop file. Then drag in your Vinyl photograph into Photoshop so that it’s a new layer above all the others. Make sure that it is centered on the canvas. I want to make guides to make it easier for us to select the vinyl disk.
Select the Vinyl disk layer. CTRL-T to enter transform mode. And then CTRL-R to enable rulers. you can drag from the left-hand side to bring a ruler on to the screen, you want this ruler to lock into the center of the disk. Now drag another ruler but this time from the top, drag this so that it locks into the center of the disk. So you should now have a cross made from your guides. Press Enter to leave the transform layer.
Now in your Tool Bar on the right-hand side of Photoshop, choose the Marquee tool. If you hold down on the Marquee icon you get as few options to choose from. Select the Circle Marquee.
While holding SHIFT and ALT, click and drag from the center of your crossed guides. This will draw a circle selection outwards. Once your selection gets to a few pixels from the edge of the disk, release so that your selection locks in.
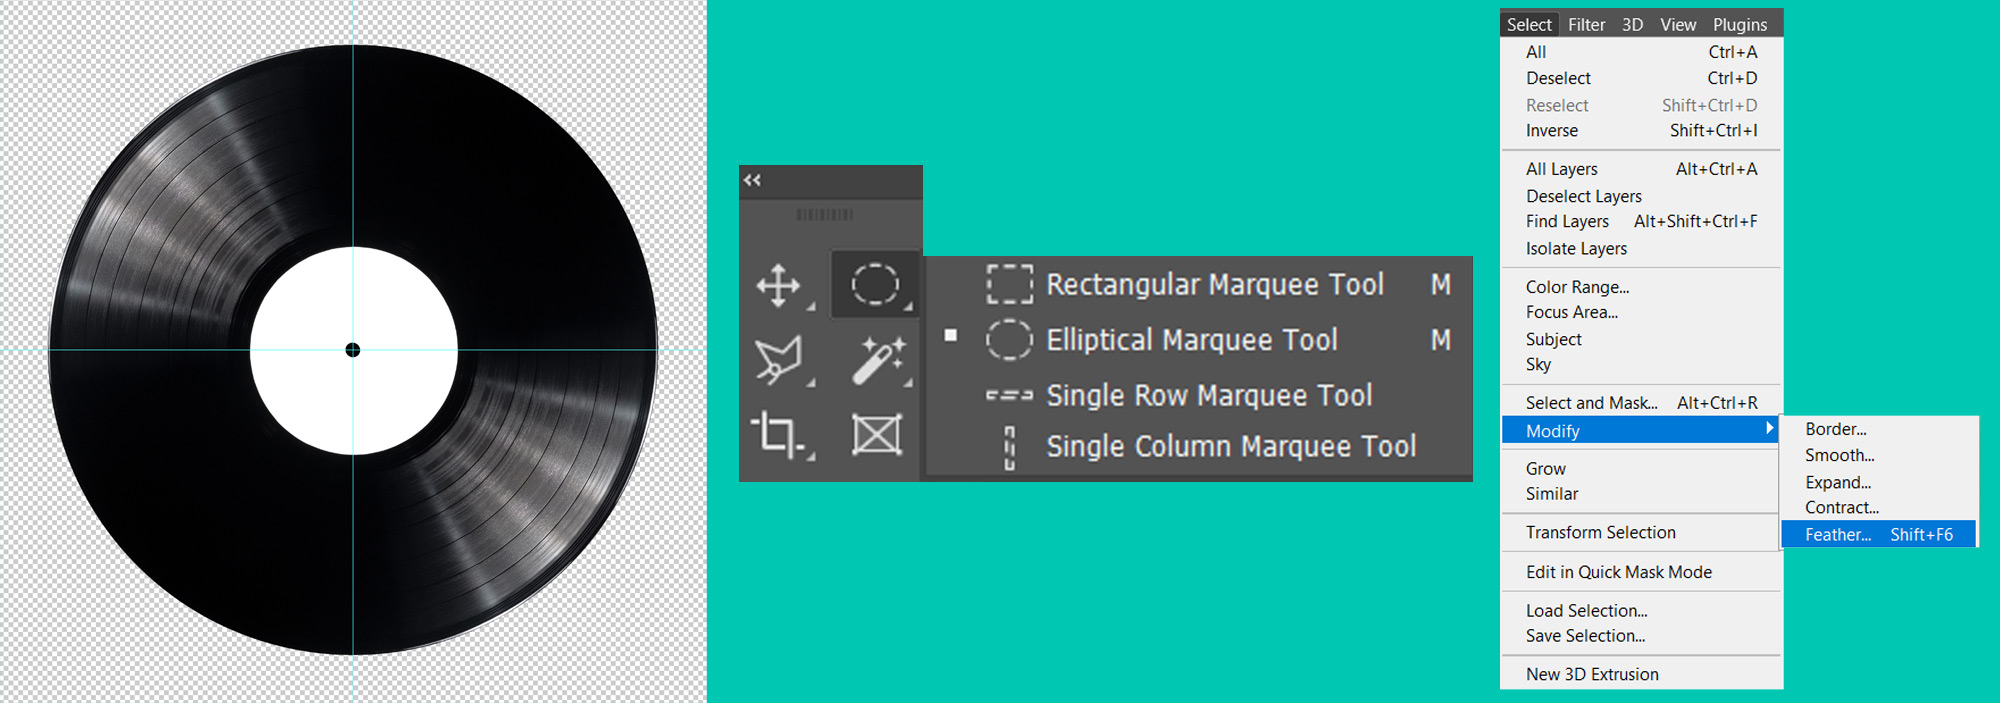
Go Select > Modify > Feather and then set it to 0.5px
You can now hit the Mask Icon on your Layers Panel to cut your vinyl disk out from the white background.
Center of the Vinyl Disk
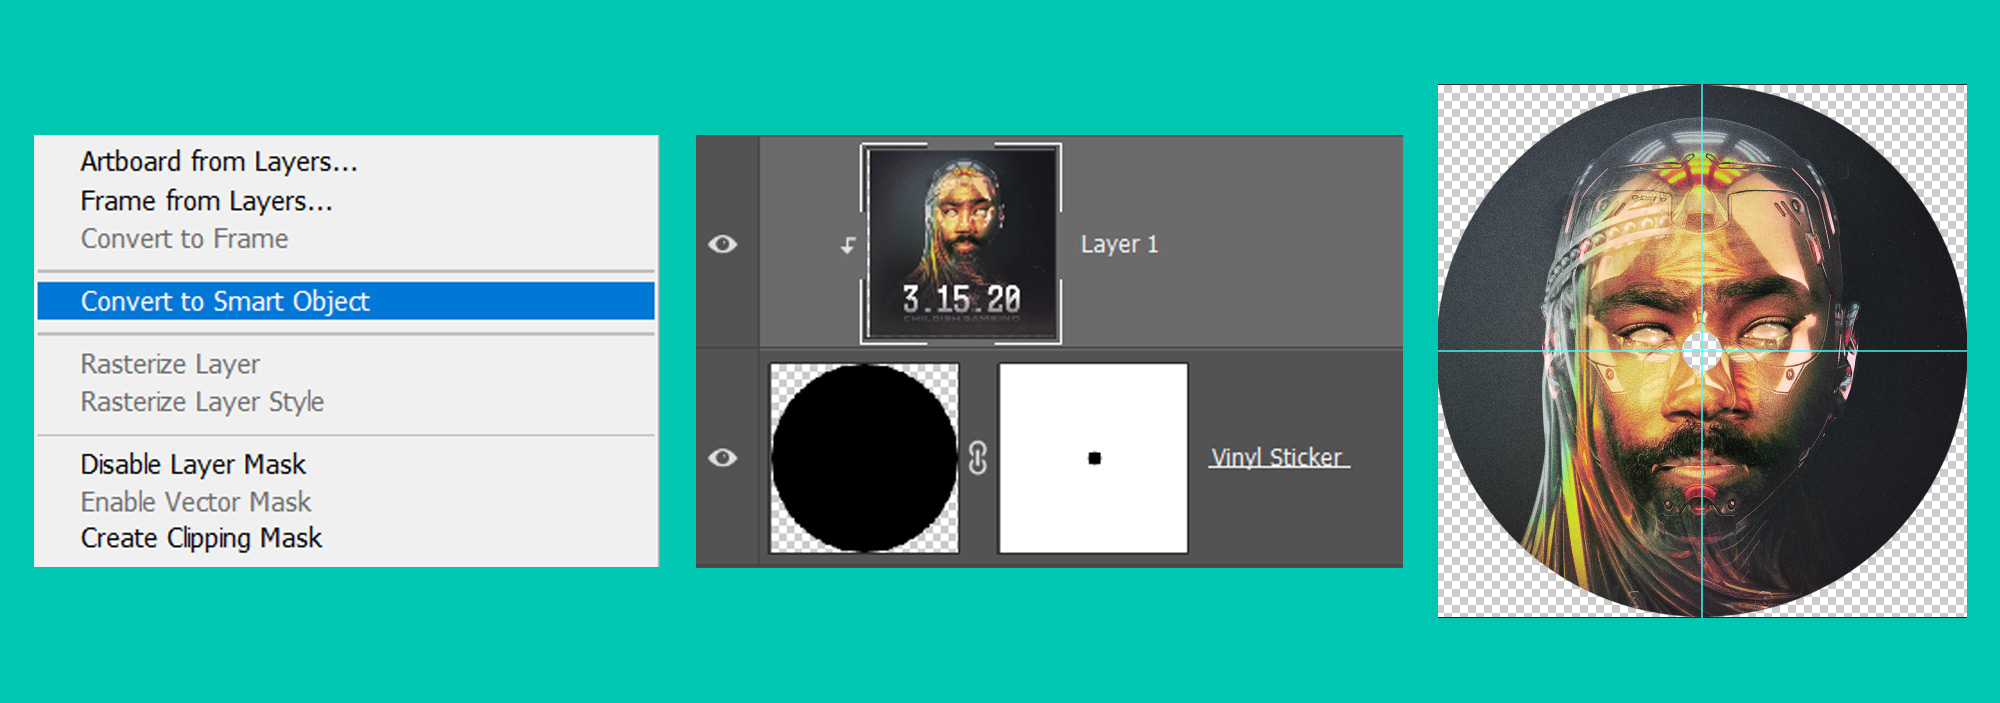
Holding SHIFT and ALT, with the circle Marquee tool, draw a selection out from the center of the vinyl disk so that it covers the white center area. Make sure to go a few pixels beyond the white area so that you get a clean selection. Make a new layer and Fill this selection in Black.
Rename this new Layer Vinyl Sticker.
Set its Opacity to 50% so that we can see the white below it. Using the Marquee tool and holding SHIFT and ALT, draw a selection out from the center to cover the small central dot on the photo. With the selection complete, click the mask icon at the bottom of the Layers Panel. So that now the Vinyl Sticker layer has a mask applied to it. We need to Invert this mask with CTRL-I so that the center dot is now a hole.
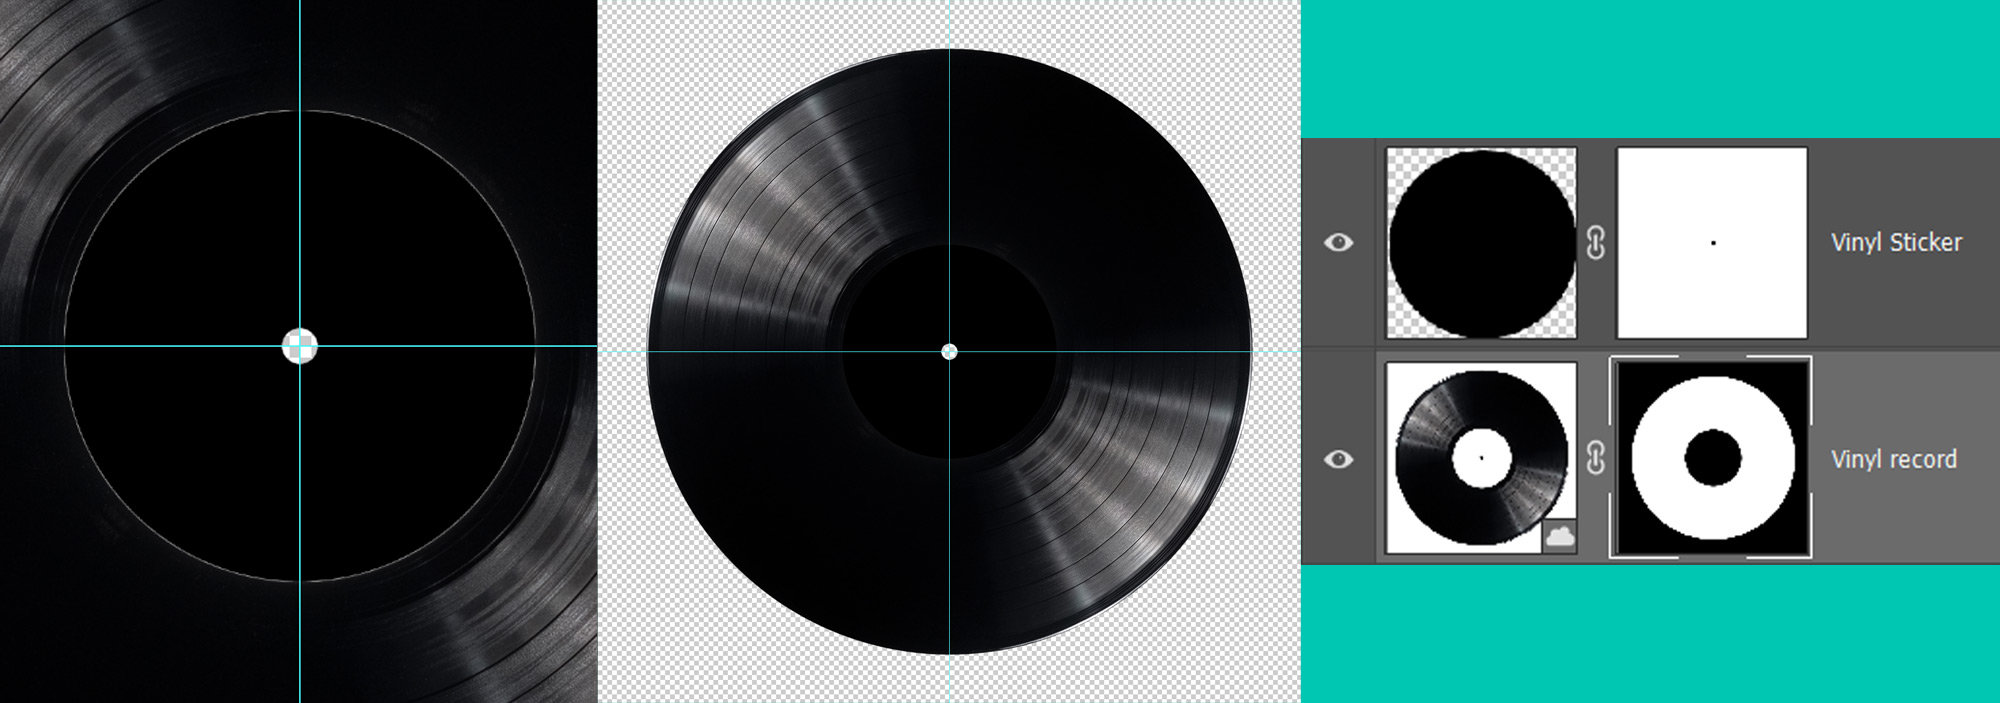
With the Vinyl Sticker layer selected, CTRL-click the thumbnail of it in the Layers Panel. This will select the black circle. Click into the Mask of the Vinyl photo layer. and fill this selection in Black. So now we have the Vinyl Photo and the Vinyl Sticker as two layers.
Right-click and press Deselect.
If you get a halo around your Vinyl Sticker Layer then CTRL-T and scale it up a little to get rid of it.
Smart Object: Vinyl Sticker
We want to make the Vinyl Sticker a Smart Object so that we can apply various filters to it in a way that is non-destructive.
Right-click the Vinyl Sticker Layer and select Convert to Smart Object.
If you double click on the thumbnail to this layer you will enter the Smart Object. We can place our artwork here. If you want to find out more about Smart Objects and how they work you can read my tutorial on Smart Objects here.
Drag in the original Album Artwork into this Smart Object PSD.
Hold ALT and place your mouse between the two layers. You will see the Layer Clipping icon appear. Click to activate the Layer Clipping.
This means you can now move and scale your artwork and it will be masked out by the layer below it.
CTRL-S to save this Photoshop File. This means the image will be auto-updated in our main Photoshop File.
Back in the main Photoshop file, select the two layers, Vinyl Sticker and Vinyl Record and then press CTRL-G to group them together. Call this group Vinyl Disk.
Right-click the Vinyl Disk group and go Convert to Smart Object.
Now select all the layers that maker up the cover, group these together with CTRL-G. Rename this group to Album Cover.
Then right-click and Convert to Smart Object.
You should now have three layers. The first layer is the Vinyl Cover, the second is the Vinyl Disk and the third is the grey background.
But wait where are all my layers? *Panic*
Don’t worry, we didn’t delete our layers. They are just hidden inside our Smart Objects. If you double click the thumbnail next to the Vinyl Cover layer it will open up a PSB with all of our layers in it. We can change anything we like here and then CTRL-S and it will update in our main file.
This makes it far easier to work with and keeps everything tidy.
Drop Shadows
One last thing before this tutorial ends is to add a drop shadow. Double click on the right-side of the Vinyl Cover layer so that it brings up the Layer Styles window. At the bottom check Drop Shadow and enter these values.
- Multiply
- Opacity 46%
- Angle 90
- Distance 6px
- Spread 0%
- Size 7px
- Noise 8%
- Anti-Aliased
Press OK.
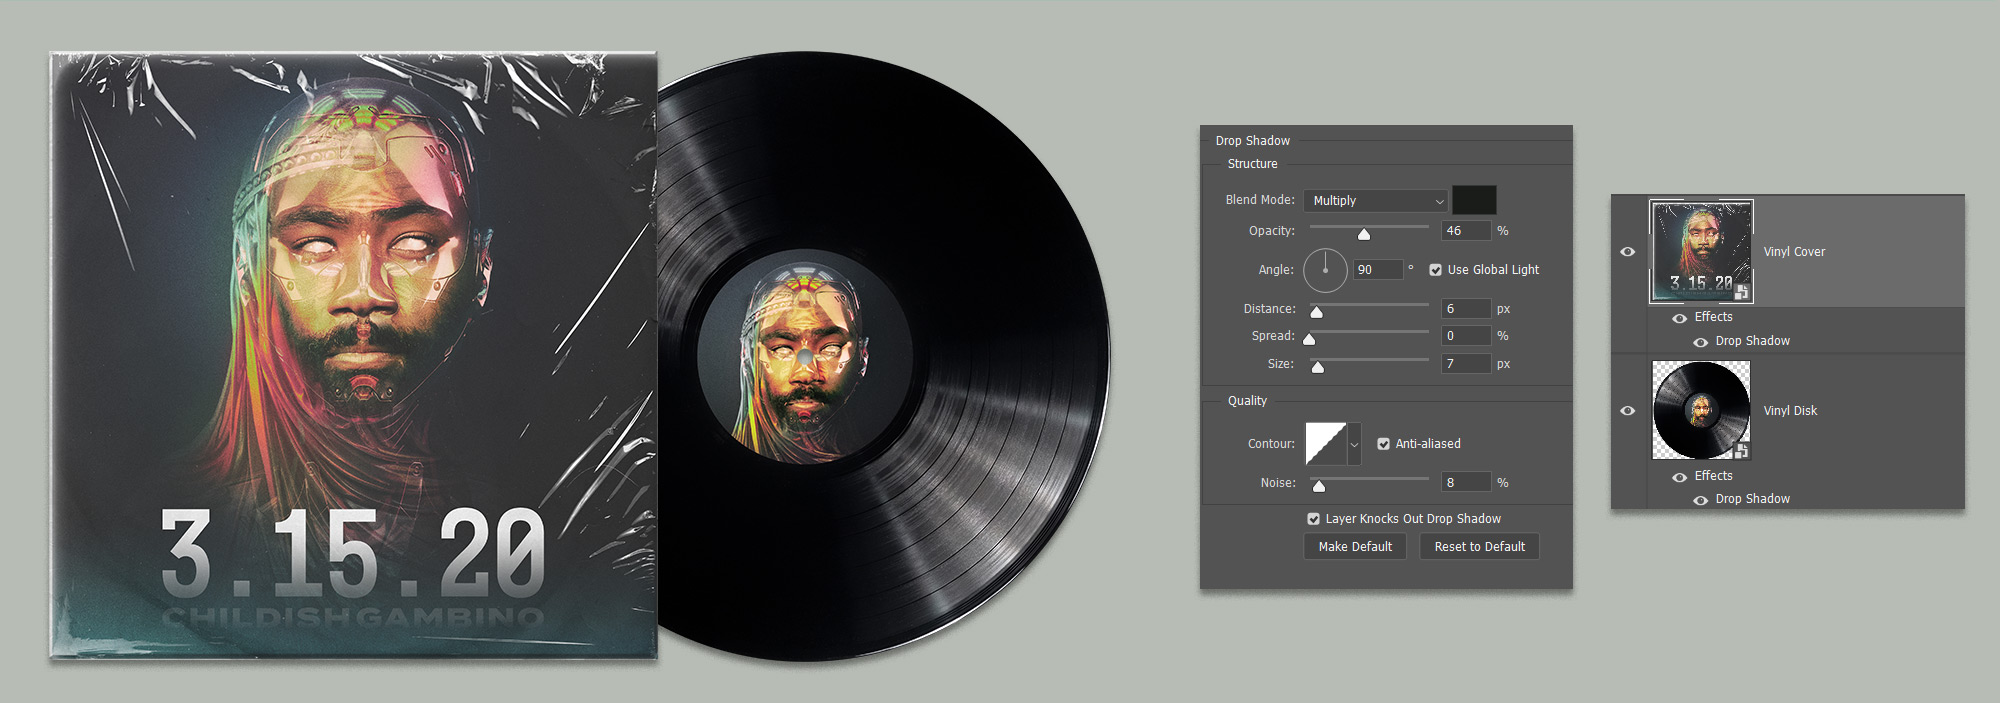
Now you can hold ALT and click and drag that drop shadow filter from the Vinyl Cover onto the Vinyl Disk. So now both layers have the drop shadow!
Next Tutorial
So now we have completed our Vinyl Disk design mockup of Childish Gambino’s album 3.15.20, we will be creating a simple social media animation in After Effects. This tutorial series is all aimed at getting you a Portfolio ready project that will get you work.