
Design an Album Cover for Childish Gambino
This tutorial is part of a series in which I will help you build a graphic design case study portfolio-ready asset that will help land you a job. In this part I will show you how to design an Album Cover which we can later use in other mockups and social post animations that will be placed on a portfolio website page as a design case study. Creating Spec work like this can be really useful when you do not have professional work in your portfolio yet but still need projects to show off your design skills.
Our eventual aim in this tutorial series is to build a Case Study portfolio page that will help land you more jobs.
Graphic design portfolios contain a summary of the best work that a Designer can create. Some of the best portfolios are presented as design case studies, where one project is broken down into parts to help businesses understand how the designer can help them in a professional capacity.
Childish Gambino
I have been a fan of Donald Glover AKA Childish Gambino, and immensely enjoyed his album entitled 3.15.20. The music he has created always makes me enter a creative mode of wanting to design and build imagery. His last album as Childish Gambino has a blank cover and so is the perfect starting point for us to create artwork for it!
Design an Album Cover Brief:
Design an Album cover for the musician Childish Gambino and his album titled 3.15.20. Listen to the album and create imagery that you feel encaptures the mood and themes of the music. Please include an image of Childish Gambino, the title 3.15.20 and the musician’s name ‘Childish Gambino’. This album cover will be used across multiple formats. File dimensions should be 3000x3000px at 300DPI. Final delivery should include, JPEG, TIFF, layered PSD.
When receiving a brief it’s good practice to go through it and highlight keywords that are directing you to create or deliver something specific. In the above brief, we are told to create high-res square album art that includes the artist’s name and album title. The delivery of the artwork is in multiple formats. For the imagery of the album cover we are told to create imagery based on the mood and themes of the music. So step one is to listen to the album!
Free Stock Images from Adobe Stock
Stock imagery is something that all Professional Graphic Designers use. It can be the difference between meeting deadlines to keep the client happy or missing a deadline and losing work. At the Design School, we teach that being a professional doesn’t have to mean you build everything from scratch but making the right choices to speed up your workflow so that you can earn more money as a professional designer, faster. We will be using Adobe Stock imagery throughout this tutorial and I have a link on the banner below that will give you ten images for free! So you can build this Portfolio Ready project for free using professional assets.
Find the theme and mood of the album
Listen to the album 3.15.20 by Childish Gambino and write down any thoughts or feelings you have toward the music. You want to end up with a shortlist of words that can help direct you when sketching out your initial ideas. If you want some outside input in this step then search Google for an album review and see what others are saying about the album. You can also look at past Album Covers for the artist and see what types of art they had commissioned.
To make this process easier I decided to concentrate on just one song as it was easier to think about themes when there was only one track to consider. So I chose the track ‘Algorhythm’ from the album 3.15.20.
My shortlist of words and themes from the song ‘Algorhythm’ are here:
Futuristic, Rise of Technology, Dark, Robotic, Evolve, Good vs Evil, Dreams.
From these keywords and themes, it becomes easier to start sketching out ideas for what our album cover might be.
Sketch out ideas
Now that we have our keywords from the album and the keywords from the brief we can start to sketch out ideas with pen and paper. These are just thumbnail sketches, they do not need to be high fidelity works of art. We are just trying to test out different compositions and ideas to see what might be a good starting point for our design.
As you can see in my thumbnails I was playing around with the idea of having Childish Gambino’s face front and center of the album cover. I tested out ideas of having a skull showing through his head, another with robotic pieces showing through. For the backgrounds, I had ideas of futuristic cities and flying cars, perhaps with abstract futuristic visuals like you might find in Blade Runner. I also played with the location of the copy (‘copy’ is an industry word that means text). These sketches are a starting place for your design to develop so be free to play with ideas in a visual way.
Before we begin
This is where we open up Photoshop and start to design this image. I am going to show you step by step how to get to the final image I show at the top of this article but I also want to show you how to think about design as you are designing. Because design is about solving problems and if you are only following tutorials then you aren’t actually solving problems along the way. So I recommend changing things up as you go through this tutorial. Make your own choices or find your own images. This is your album cover – have fun with it!
Adobe Stock Images
For this design, I am using Adobe Stock to source the imagery. For professional work, I find that having access to high-quality stock imagery is essential to get to a final design faster. The benefit with Adobe Stock is that you can add images directly into your Photoshop Library meaning it’s really fast to bring imagery into your designs and you can share this Library between Adobe Programs. Other websites that offer free stock imagery are Pexels and Unsplash. Both have great copyright-free imagery. But the benefit of a service like Adobe Stock is the amount of very specific choices you can have with your searches.
Downloading Images
Before you start buying any images from Adobe Stock, we need to be sure that these are the ones that will use in our design. I use the ‘Download Preview’ button which will give me the low-quality version of the image that I can then play within my design and see whether it is something I want to purchase. In Adobe Stock you will see the button ‘Add to Library’ – this has been so useful to me to create a library for each large project I work on. You can add images, logos, colors, and even fonts.
Design an initial mockup
Let’s create a new Photoshop document. CTRL-N to bring up the new document window, and input width and height to 3000px and the resolution to 300DPI. Set the background color to Black and Color Profile to sRGB.
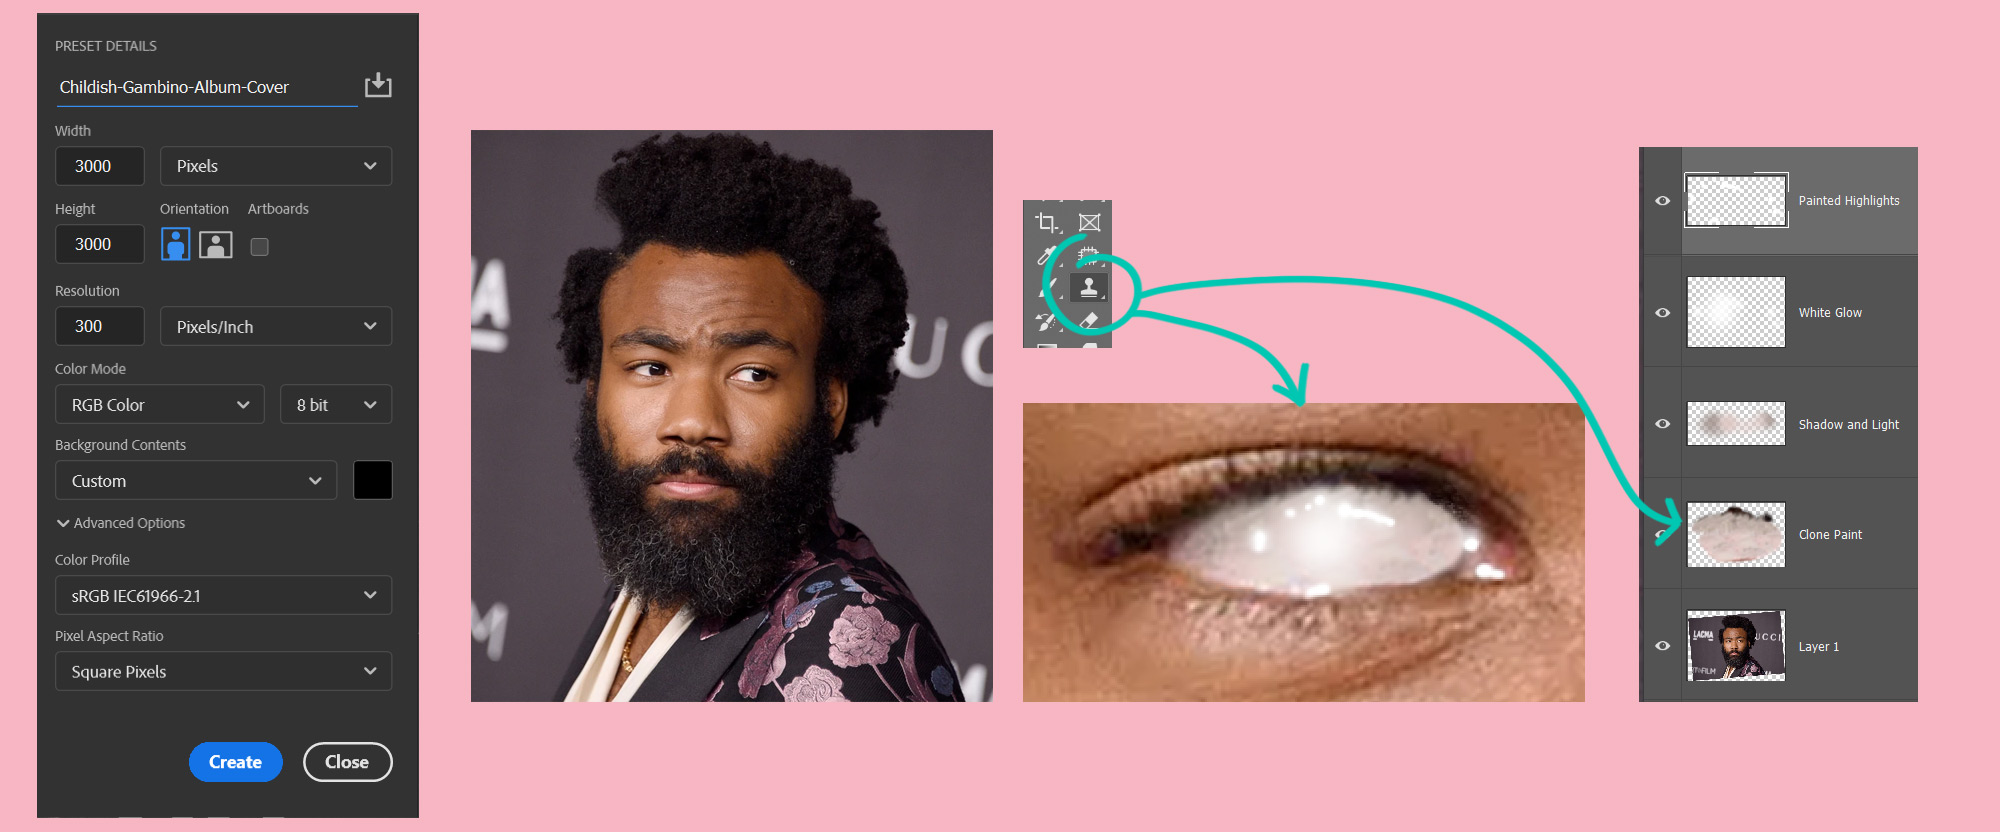
We will be using this image of Childish Gambino Image – this is the only image we will use that is not copyright-free, so use it at your own discretion. The first thing I want to do is rotate it so that his eyes are level. Then I am going to paint out his iris’ of his eyes so that we just have the whites showing.
Clone Paint Layer
Create a new layer and call it Clone Paint by clicking the Plus icon at the bottom of the Layers Panel. Using the Clone Stamp Tool in the Tool Bar and then holding down ALT you can sample part of the white of his eyes and then paint out his iris’. It’s best to do this on a layer above the actual photo.
If you keep on sampling small areas of the white of his eyes and paint as you go, rather than trying to paint the iris out in one quick brush stroke.
Shadow and Light Layer
Next, I want to smooth out the Clone Stamp a little. So make a new layer and name it Shadow and Light. Choose a soft brush from the brush panel and set the Opacity to 50%. Holding ALT, sample a shadow color in the white of his eye and paint around the edge to darken it a little. Then holding ALT, sample a bright part of the white and paint it in the middle. This helps give a little depth to the white and stops it from looking so flat.

Painted Highlights Layer
Make a new layer and call it Painted Highlights. If you turn off the Clone Paint layer you will see the highlights on the eye, all we are going to do is use a Soft Brush set at 100% opacity and paint over those real highlights by painting on our new layer called Painted Highlights.
Tip: You can control the brush size with the bracket keys on your keyboard: [ and ].
White Glow Layer
Make a new layer and drag it under the Painted Highlights layer. Call it White Glow. The highlights we have are a little harsh, so by using a soft brush with Opacity
Now repeat this process for the other eye!
Select all the eye layers and group them together and call the group Eyes.
Mask out the face
We need to isolate Childish Gambino’s face so that we get rid of the background and can more easily Photoshop in the other elements we want to layer in.
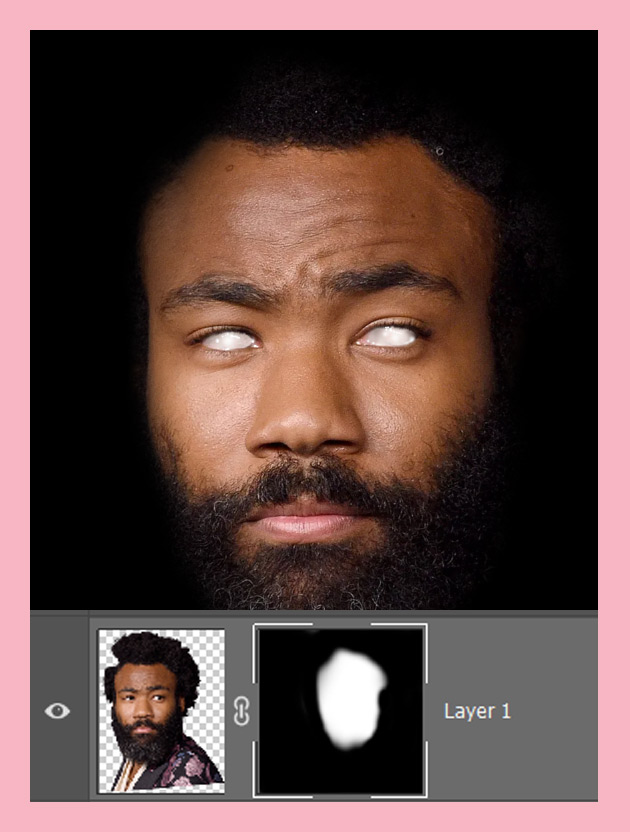
The easiest way to do this is to use a Mask. Click on the Photo layer with Childish Gambino’s head in. Then Look for the Mask icon at the bottom of the Layer Panel. Click this icon and a mask will appear next to the photo. Using a Black color and a soft brush, paint over everything that isn’t his face. So that now his face sits on top of a black background. The great thing about editing the photo in this way is that it is non-destructive. Meaning that we can paint back in parts of the photo at any time we wish. Whereas if we just cut him out with the Polygon Tool, for instance, we could not bring back parts of the photo without having to do the process again. Working Non-Destructively is the professional way of working with images.
Select the face and eyes layer and group, and CTRL-T. Very slightly scale it from the Left Edge of the transform bounding box. We just want to make his face a little thinner. This is subtle, so don’t go overboard on it.
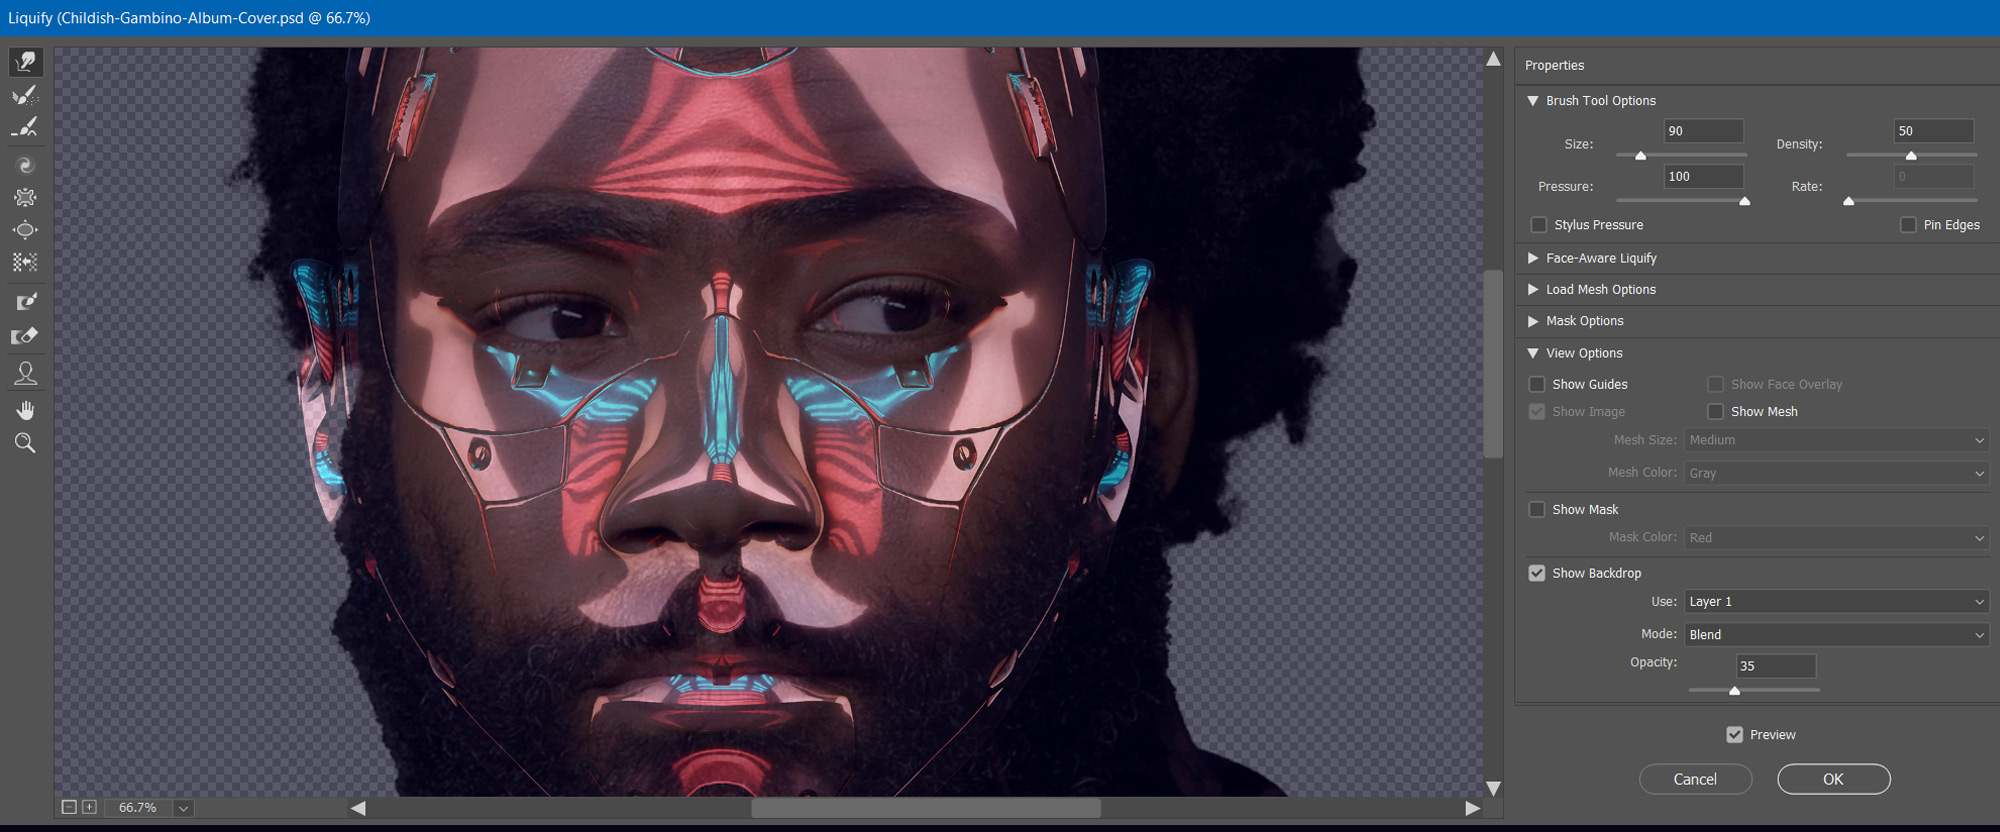
Cyborg Layer
I will be using this image from Adobe Stock of a Cyborg’s head. If you click the banner below I can give you ten FREE Adobe Stock Images that you can use to build this portfolio piece!
The main thing we have to do to this Cyborg is to use the Liquify Filter on its nose and push the nostrils so that they match Childish Gambino’s nose. Drag the Cyborg photo onto the Photoshop Canvas. Set it’s Opacity to 50% and Scale it with CTRL-T so that it matches the proportions of the head below it as closely as possible.
Then With the Cyborg layer still selected, go to: Filter > Liquify. On the right hand side, check the tick box that says ‘Show Backdrop’ and then select the layer with Childish Gambino’s head is on. This will allow us to see the head below it. Using the Push Tool, gently nudge the nostrils into place using the photo as a guide. Once you are happy with your position, press ok to accept it.
In the Layers Panel, select the Cyborg layer and set it to screen with an Opacity of 100%.
Mask the Cyborg Layer
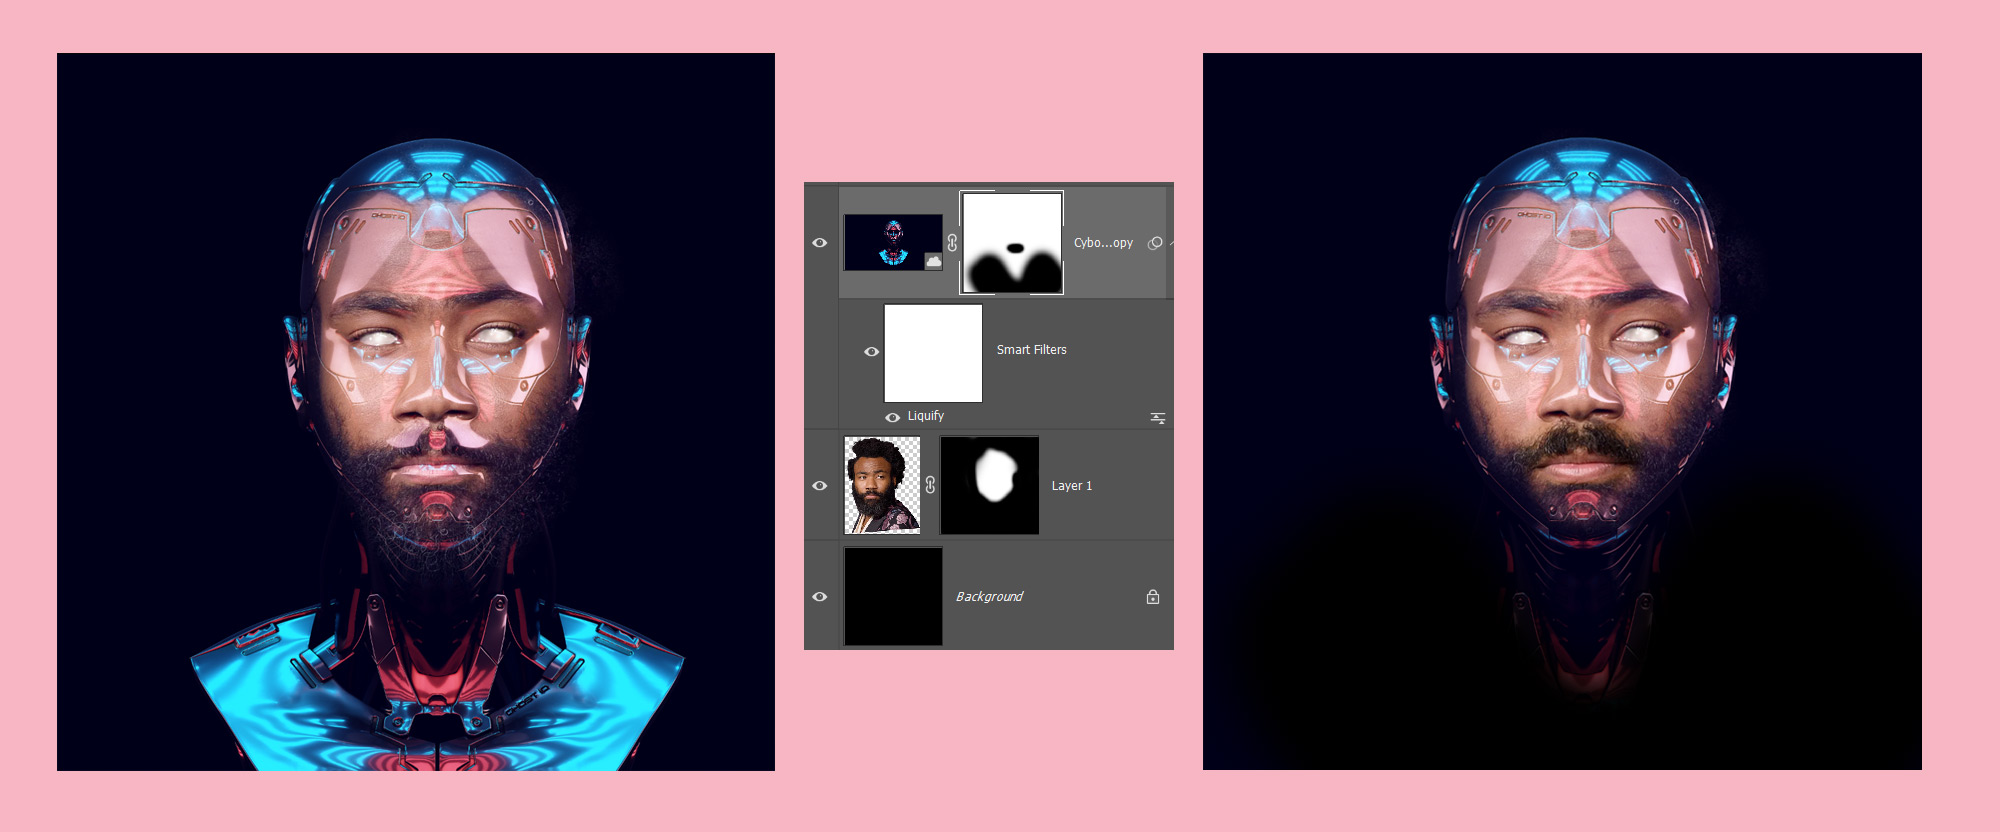
With the Cyborg layer selected, press the Mask Layer Icon at the bottom of the Layers Panel. Then with a soft brush, paint out the shoulders and the reflections around the top lip. I also went back to the face layer to mask out some of his beard.
Sculpture Layer
The next image we will use is this one from Adobe Stock. Don’t forget that you get this image for free if you click the Adobe Stock banner! It’s a 3D rendering of a sculpture of cloth over a woman’s head. We will use part of this image by placing it over the cyborg layer and then masking it out.
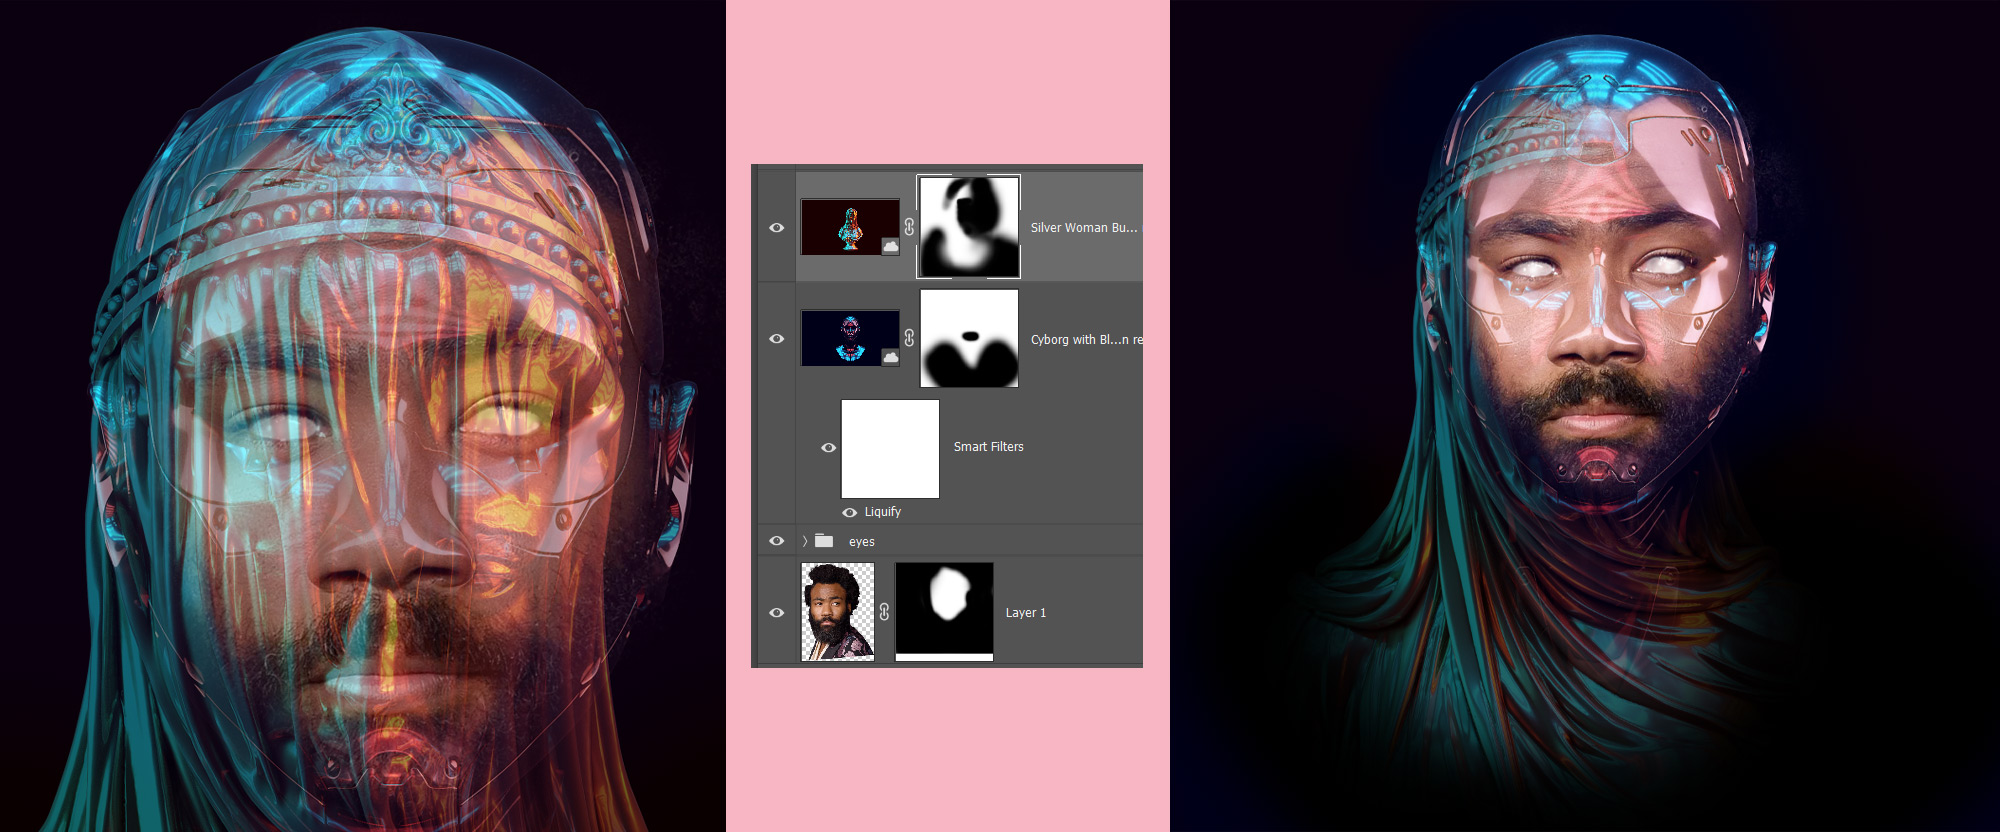
Set the Sculpture Layer to 40% Opacity so that we can see the layers beneath it. We want to position this layer so that the left-hand side of the sculpture lines up with the left-hand side of the head. We will mask out the right-hand side in a second so don’t worry that this doesn’t line up.
With the Sculpture Layer Selected, click the Layer Mask Icon at the bottom of the Layers Panel. You will want to mask out pretty much everything other than the left side fabric folds that run down the left-hand side and under the chin. Also look to the top of the head on the left side and use a soft brush to gently remove some of the fabric there so that we see the Cyborg’s top of the head. I also removed some of the fabric around the eye areas and near the mouth just to keep those areas clear.
Set the Sculpture Layer to the Blend Mode Screen and Opacity to 100%.
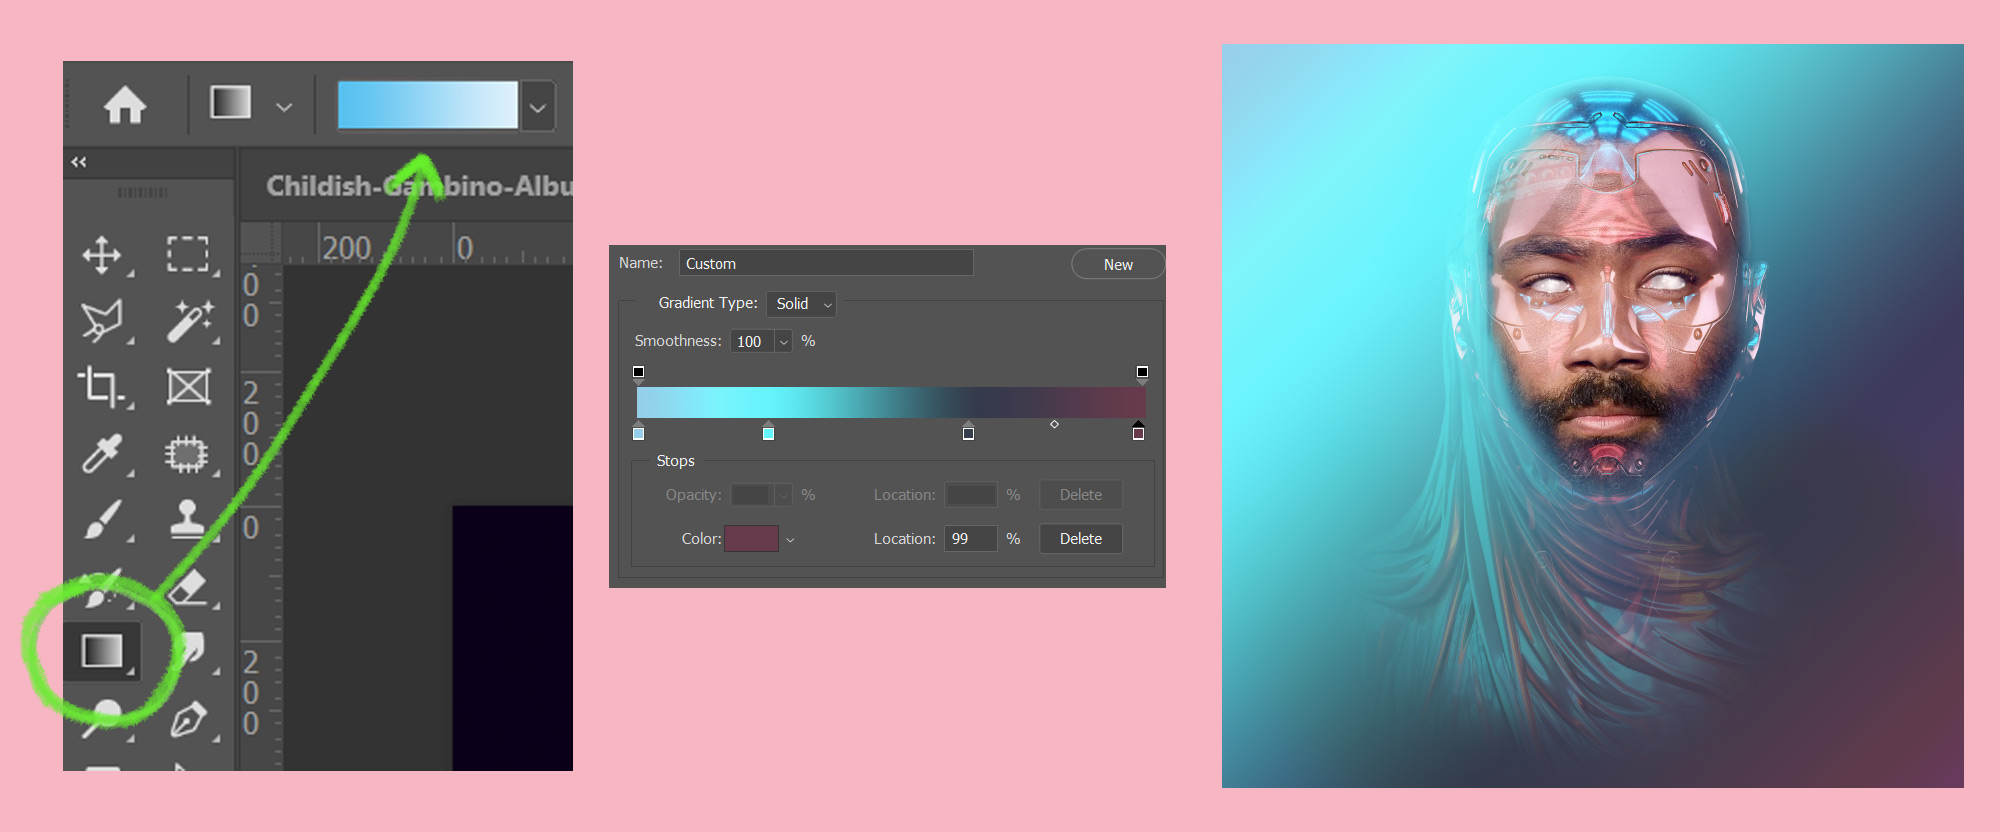
Gradient Backgrounds
We need to make two new layers that sit under all the other layers. These will form a gradient background which will produce some subtle effects when we do the color correction in the next step. Feel free to copy this image into Photoshop and just color-pick the colors from here – might be quicker than typing out the Hex codes!

Using the Gradient Tool from the Tool Bar we will make two layers. Name the First Layer, ‘Blue Gradient’ and the second ‘Orange Gradient’.
At the top left of Photoshop – with the Gradient Tool selected, you will see the gradient bar appear in the top menu. Double click this to open the Gradient Editor.
At the bottom of the Gradient Editor, click the far left Color Stop. This little square contains the color information for part of the gradient. Once you click the left-side Color Stop you can then double click the Color swatch below to change the color of the Color Stop. Enter a light blue color. I have used: #95cee9
Now click the right-side Color Stop. Change its color to #673a4d
I am going to add two more Color Stops into our gradient. Check the image for their position.
Change the middle left to: #65f4fc
Change the middle right to: #353e4c
Drag diagonally on your canvas and release to paint your Gradient across the layer. You can drag it out in different ways.
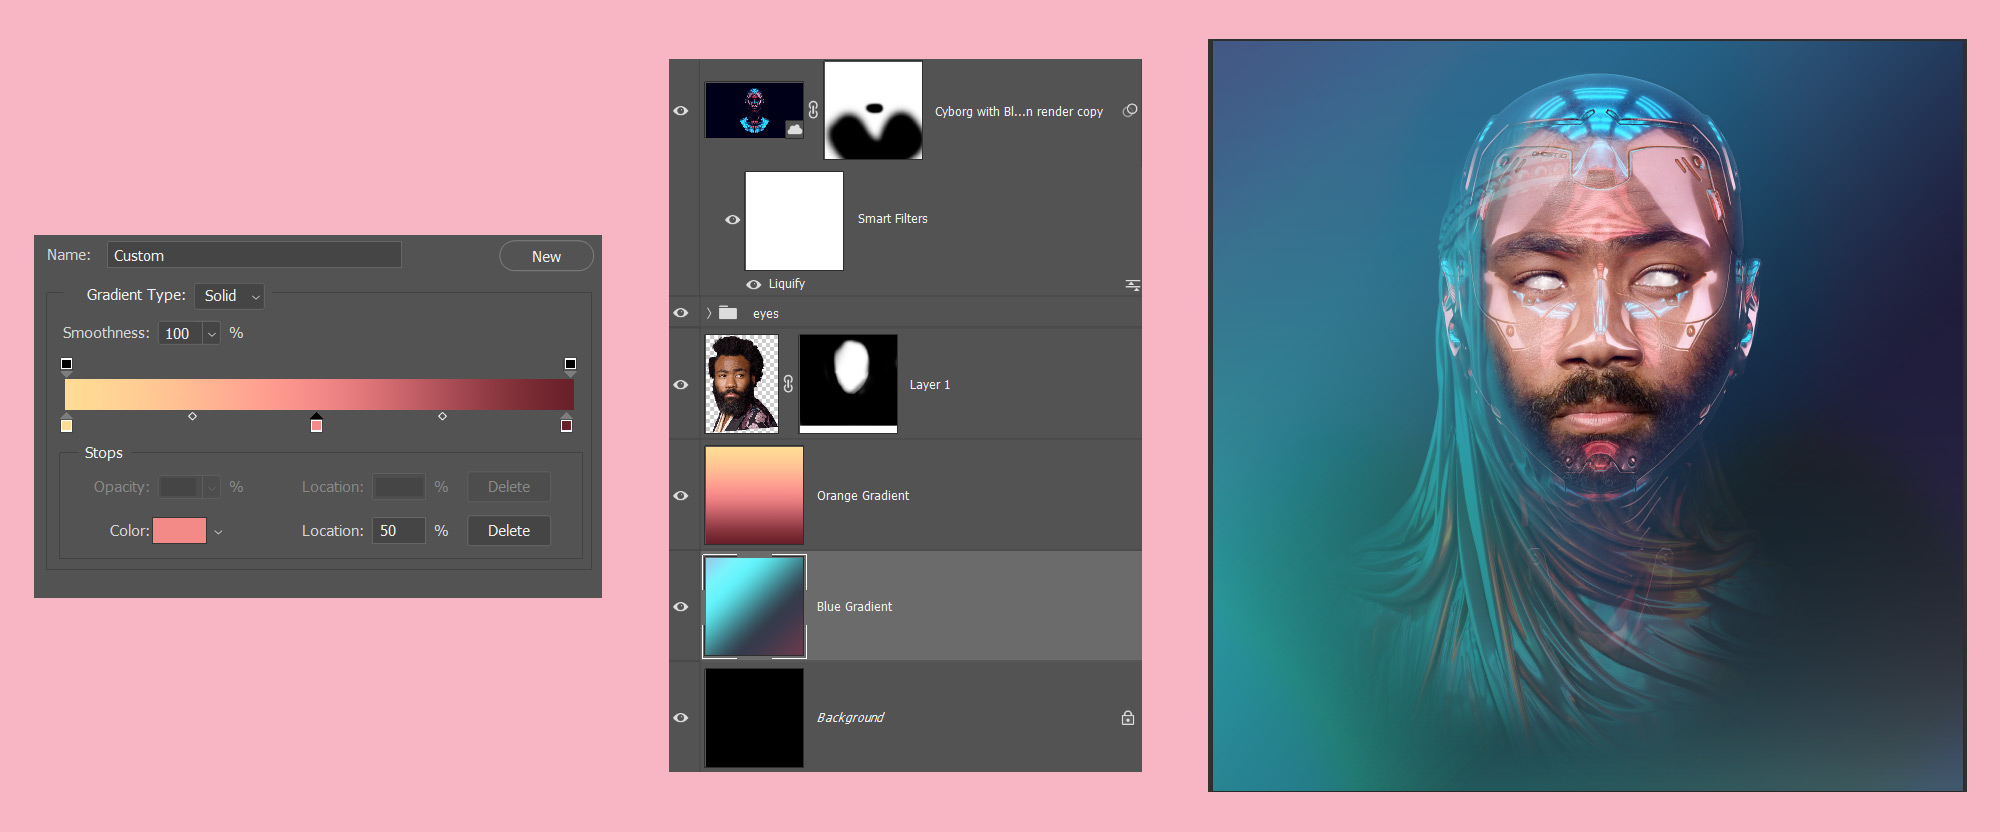
Orange Gradient Layer
We are going to do the same thing for the Orange Layer.
Set the left color stop to: #ffdd94
Set the right color stop to: #6a202a
Then make a middle color stop and set it to: #f38a87
Now drag down on the canvas to create a vertical gradient that runs from light to dark.
Gradient Blend Modes
Set both the Blue and Orange gradient layers to 40% Opacity. Then set the Blue Gradient Layer to Lighten Blend Mode. Set the Orange Layer to Divide Blend Mode. If you run through the blend modes you will see that there’s a huge variation in effects by just playing with these. Have fun with it!
Clean up your masks
Now is a good time to revisit your mask that’s on the Photo of Childish Gambino. Use a soft brush and paint out any parts of his head or hair that are sticking out from Cyborg’s head. You can set your opacity on this brush to 20% and gently fade out the mask around the edges of his face so it looks like his head is softly begging wrapped by the Cyborg layer.
Color Correction
This is where your final image will become very different from mine. And the reason is that it’s just too much fun playing with the effects I am about to show you!
In the Layers Panel, at the bottom click the Create New Adjustment Layer icon and from the list choose Gradient Map. This is a super powerful adjustment that can produce some great results.
Double click on the Gradient Maps thumbnail to open the Properties window.
Then double click into the Gradient Color to open the Gradient Editor.
The Presets we have here are pretty good and we will use one here. In the Iridescent Folder, choose the far right one on the second row.
Move the Pink right-hand side Color Stop towards the middle.
This will help bring out some of the colors later on.
Click OK, then click Reverse on the Properties window. This little tick box is good test out various gradients so keep it in mind if you choose a different gradient.
Now in the Layers Panel set the Blend Mode to Hue.
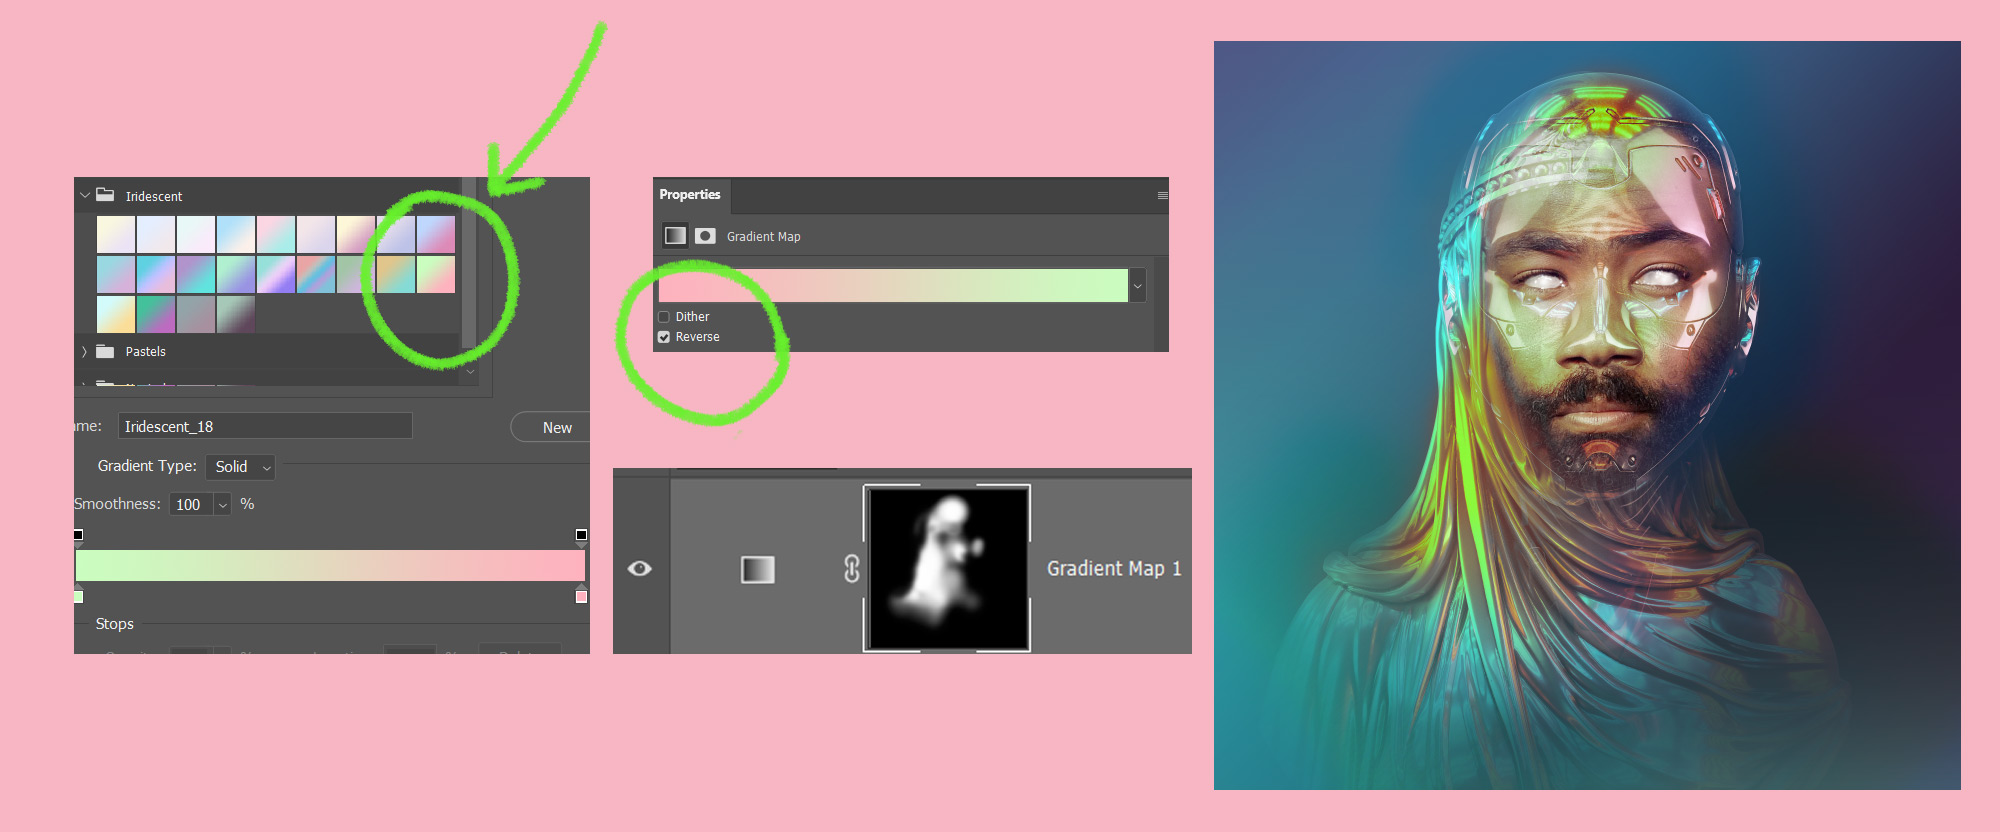
Select the mask of this Gradient Map and press CTRL-I this inverts the mask and so makes our gradient disappear. I want to paint it back in via the mask but only in specific areas. So I have painted it back in along some of the folds of the fabric and at the top of the head where there are reflected lights. But use your own artistic judgment here. What looks good to you? We will be adding a few different color corrections to this piece so each will add something a little different that you can change to your liking.
Gradient Map: Green
At the bottom of the Layers panel, click the Layers Adjustment Icon and select Gradient Map. Double click the Gradient map icon and click Reverse. Then double click into the Gradient Editor. I am using the green gradient folder and selecting the far right-hand side green on the second row – it’s called Green_18.
Set this Gradient Map layer to Soft Light.
Color Look Up: Foggy Night
Using the Adjustment Layer icon at the bottom of the Layers Panel, choose Color Lookup. This adjustment layer can really change the look of an image. Double click into the Color Lookup thumbnail in the Layers Panel to open the Properties Panel. You can change the 3DLUT File by selecting a LUT from the drop-down. Think of these like Blend Modes, they adjust the image dramatically in different ways. I am setting mine to Foggy Night.
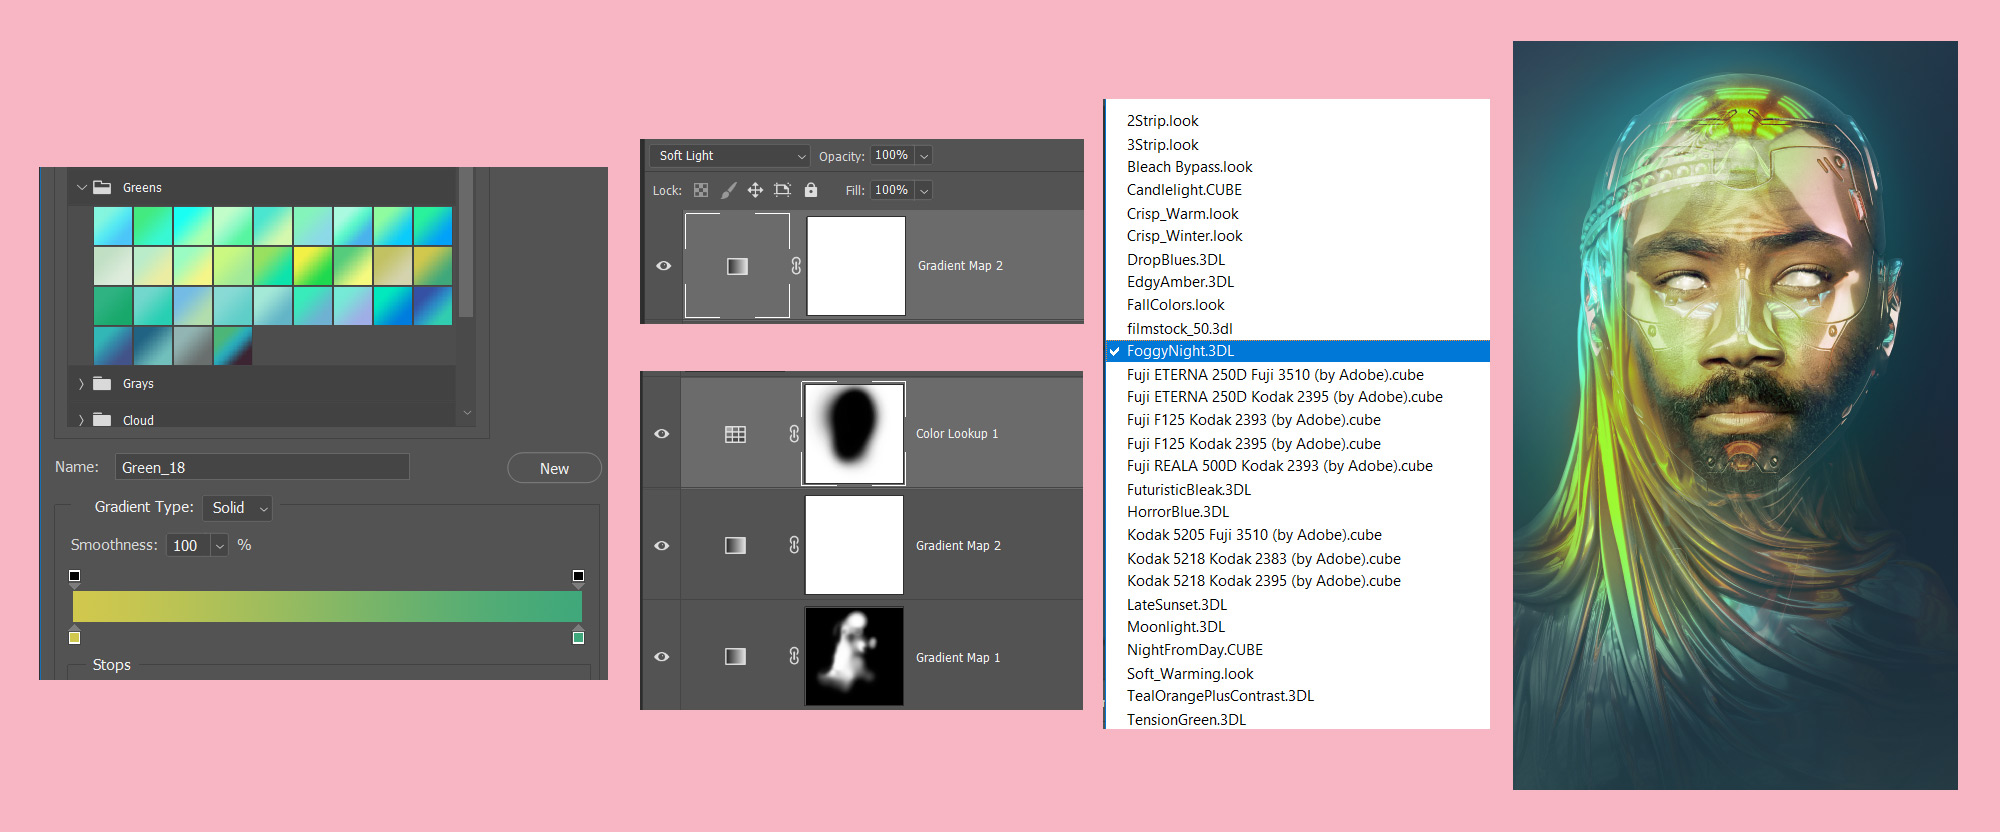
I have then painted black in the mask of the Color Lookup so that the face is not being affected by it.
Channel Mixer Adjustment Layer
There are all sorts of ways to achieve similar results to the ones we will get using these adjustment layers, so feel free to really play with these and see what effects you can get.
However, I am going to add a new adjustment layer called Channel Mixer and in the Properties Panel, I am going to use the Preset Black and White with Yellow Filter. I am trying to get a mysterious and dark image and this moves me subtly in that direction.
Set the Blend Mode to Darker Color and Opacity to 60%.
Selective Color Adjustment Layer
Another adjustment layer. At this point, we’re just going through them all!
From the adjustment, layer list select Selective Color. Then in the properties panel set the color to Red with these settings:
Cyan: -10%
Magenta: +15%
Yellow: -5%
Black: 0%
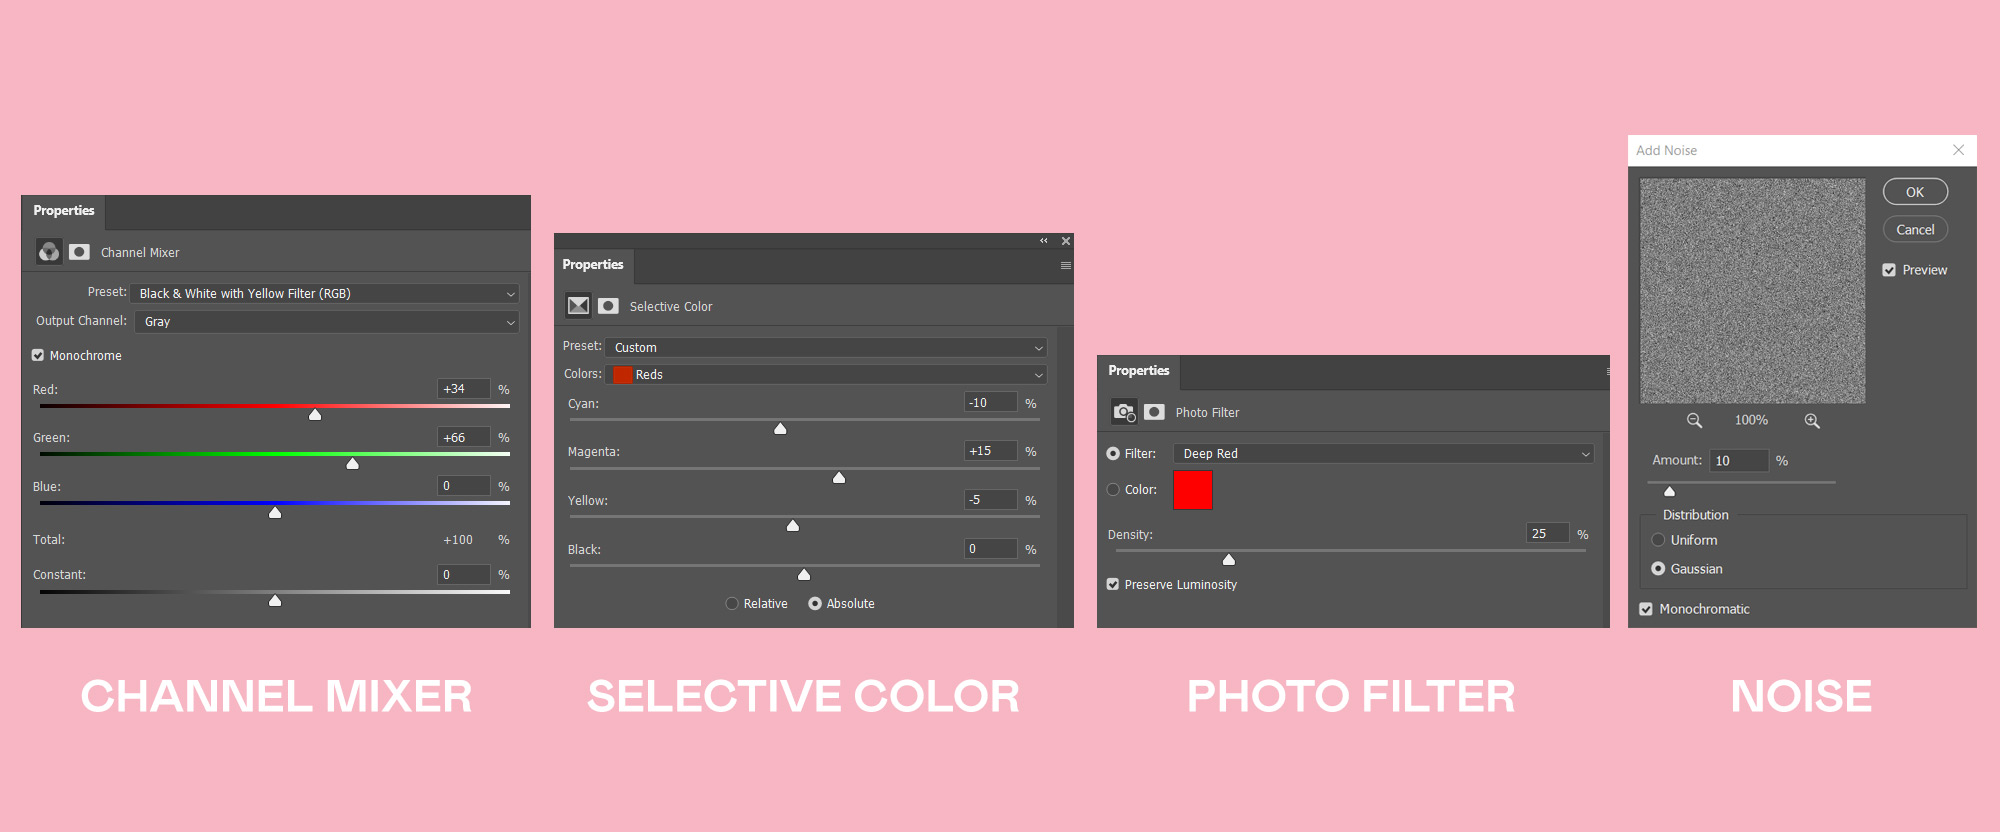
Photo Filter: Deep Red
From the Adjustment Layers list choose Photo Filter and then set this to Deep Red.
This warms up the image a little. We could have done this with a curves adjustment layer or to be honest a number of different ways. But At this point, we’re just having fun with adjustment layers and seeing what they do!
Add Noise
Adding a little noise to our image can make it have a little less digital and more like it was a photo taken somewhere. It’s relatively simple to do this and I shall show you how.
In the Adjustment Layer list, select Solid Color – then double click into its thumbnail and set the color to #7e7e7e which is a mid-tone grey.
With the layer selected go to Filter > Noise > Add Noise – it will ask you if you want to Convert To Smart Object? – Click Yes
Set the noise to 10%
Because this is a Smart Object you can double click on the Smart Filter Noise and adjust it whenever you want. So if you want the noise to be less then you can set the amount down.
Change this layer to Overlay Blend Mode.
Now go and play!
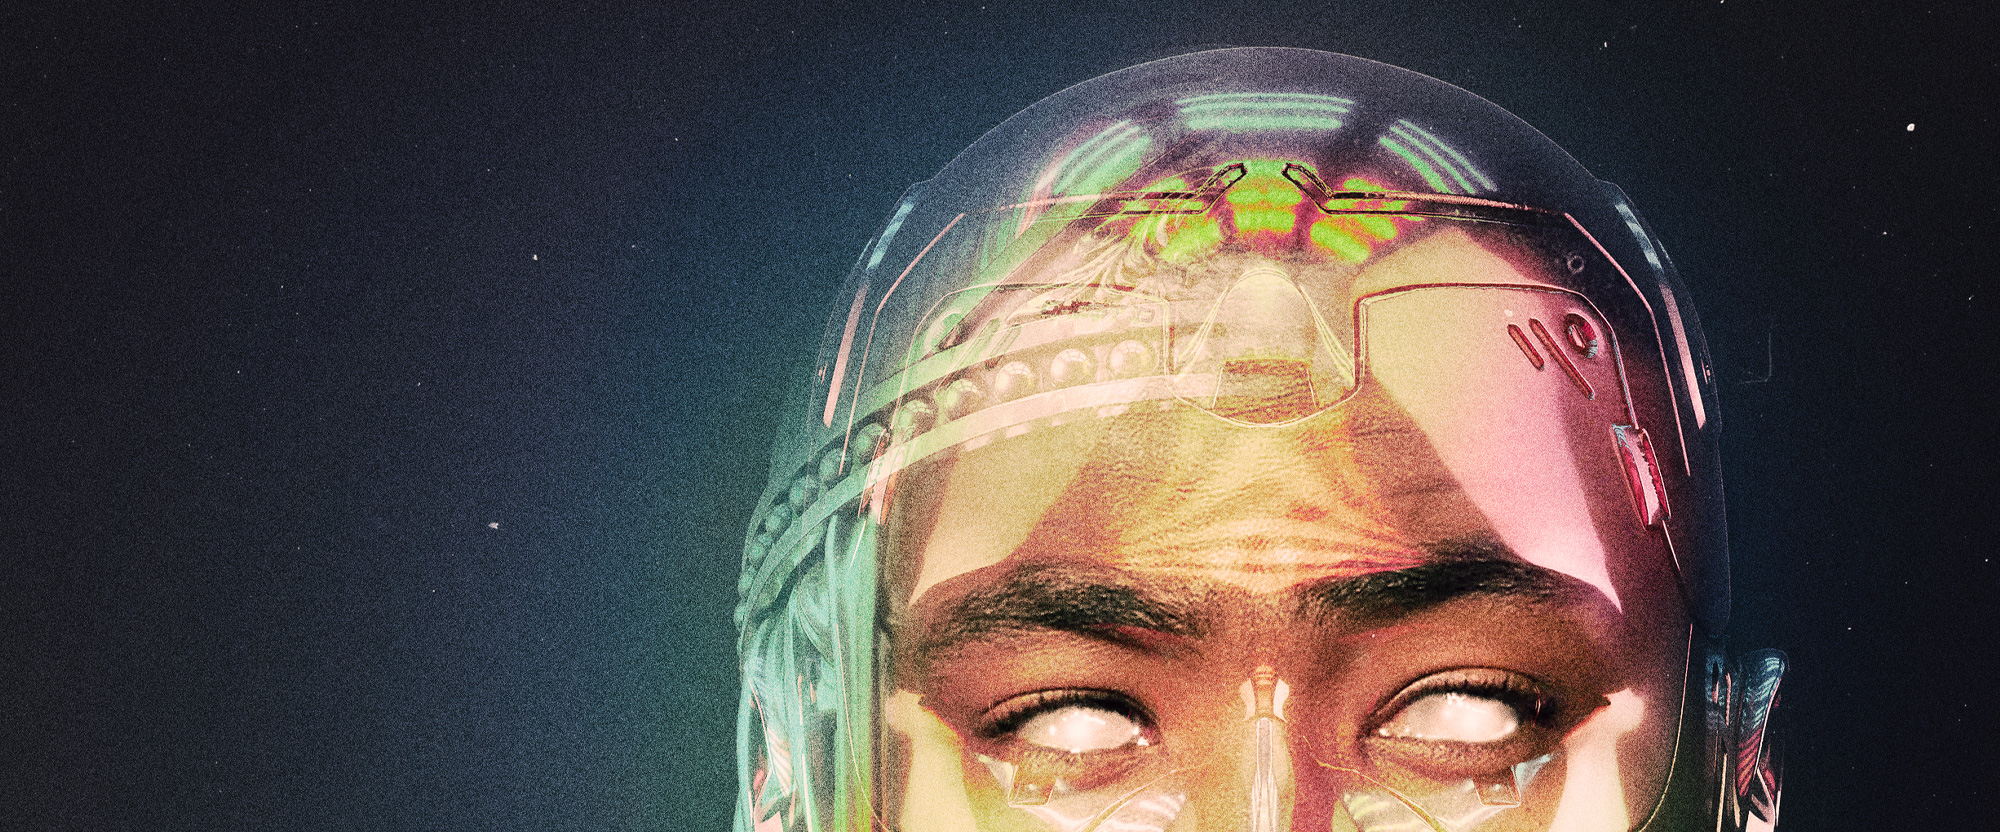
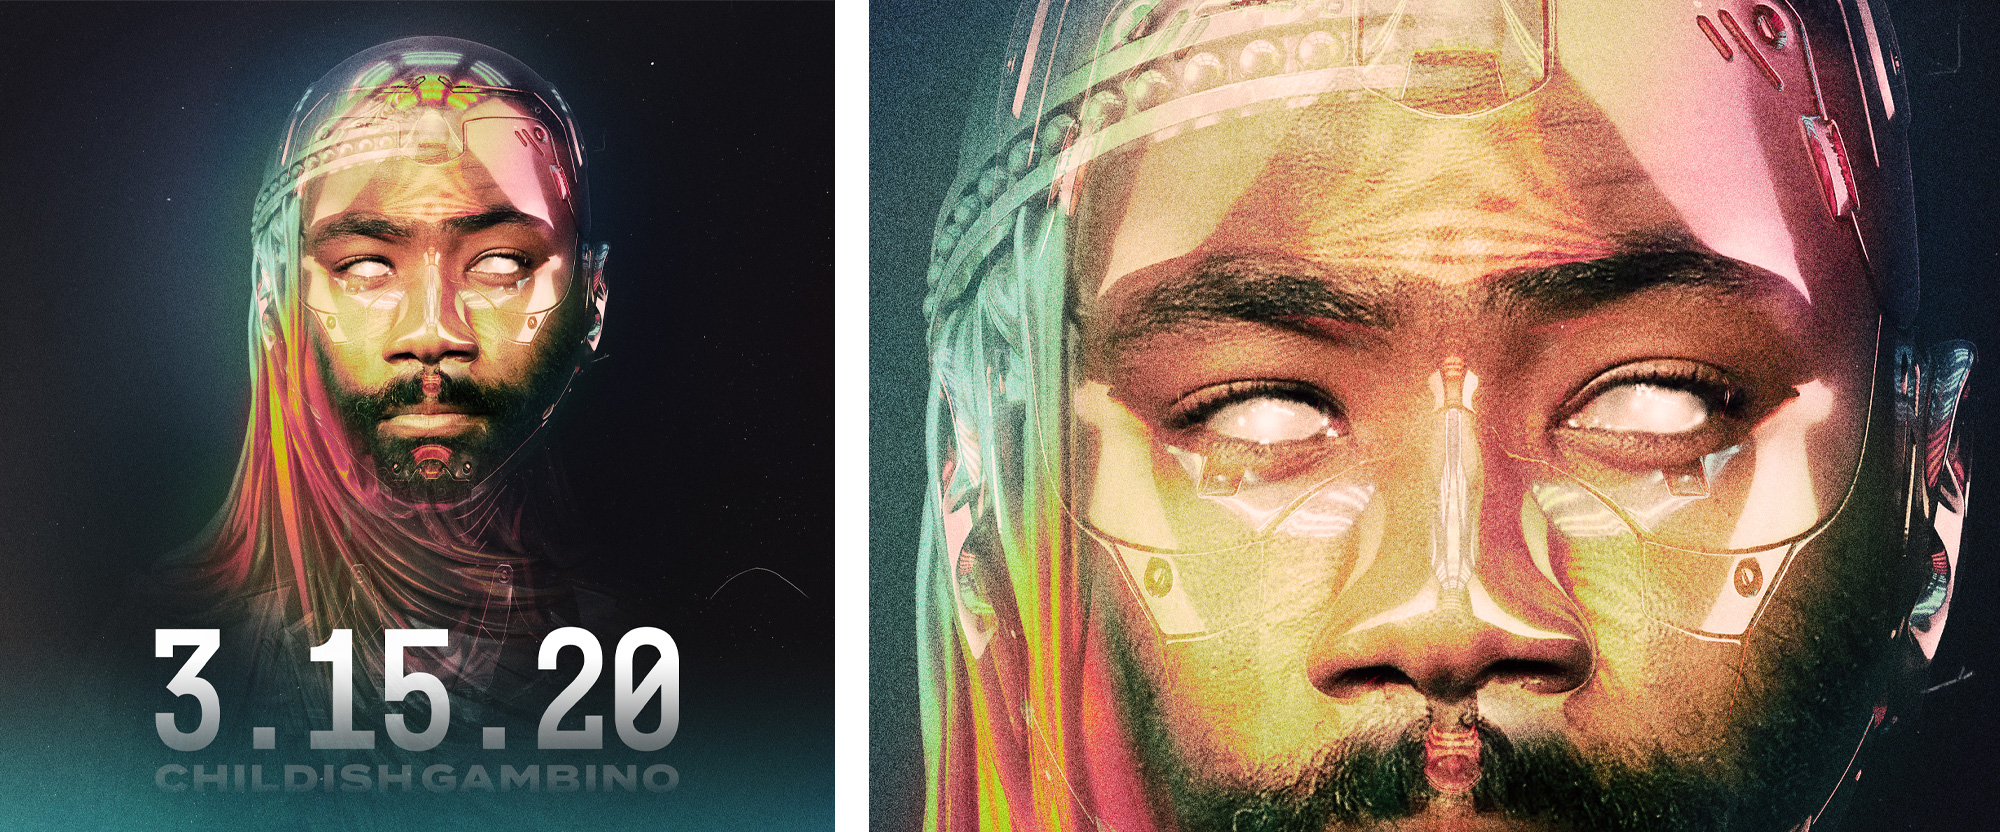
We are at the point now where the general image is done. You can keep on adding various adjustment layers, alter their Opacity, Blend Modes, and settings to achieve all kinds of looks. In my mind, I was trying to match an old Movie poster. Rich colors in parts and then faded in others. I added in a dust layer – you can just Google dust texture and look for a black and white image that you can then set the Blend Mode to screen and now you have old dust layered onto your image.
I also added some basic text of the Album Title and Artist Name using the font Mono45 Headline Regular. I put a gentle gradient fade in its Layer Mask so that it fades out a little at the bottom.
I highly recommend playing with this image to make it our own! This tutorial is part of a series of tutorials that build a portfolio-ready piece that will help land you work! So go check out the other parts when you are ready to take on the next chapter.
2 Responses
Comments are closed.